Step-by-step installation
How to get an Android phone ready with LlamaditApp, starting from scratch, with a screenshot of every screen. Written for someone who knows nothing about computers: just follow the steps in order.
1What you need
- The Android phone (Android 8.0 or newer) with its SIM card inserted.
- The SIM card PIN (it is on the plastic card the SIM came in).
- A Windows computer with an internet connection.
- A USB cable that can transfer data (the phone charger's cable usually works).
- Photos of the people they will call. You can take them with the phone itself.
- Optional: a Google account and WhatsApp, for video calls.
2Erase the phone (factory reset)
LlamaditApp can only take control of the phone if it has just been erased, like new. If the phone is new and has never been turned on, skip to step 3.
On a Samsung
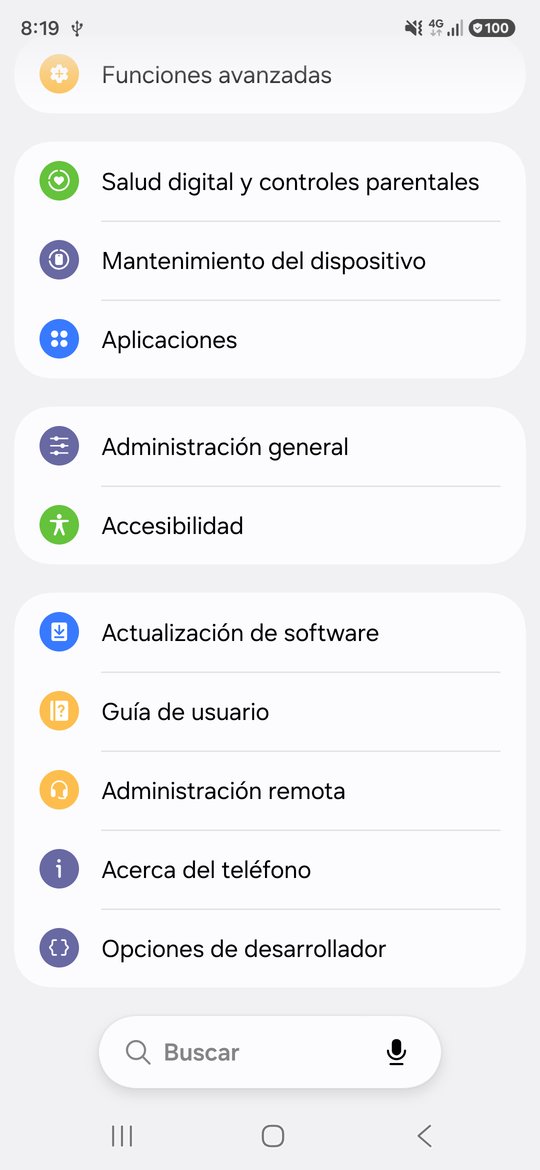
- Open Settings (the gear icon) and scroll down to General management.
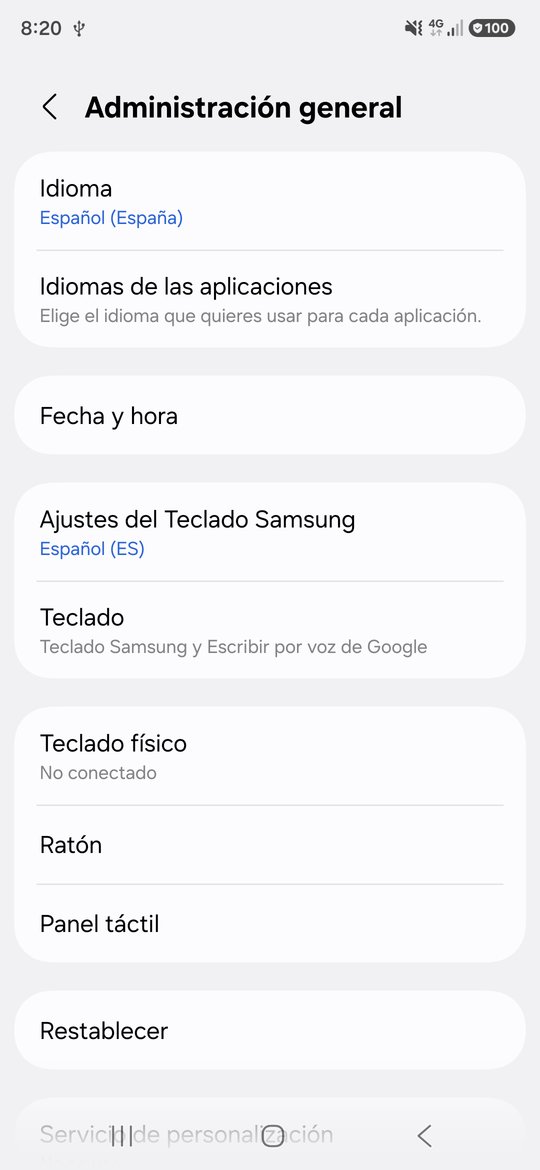
- Tap Reset.
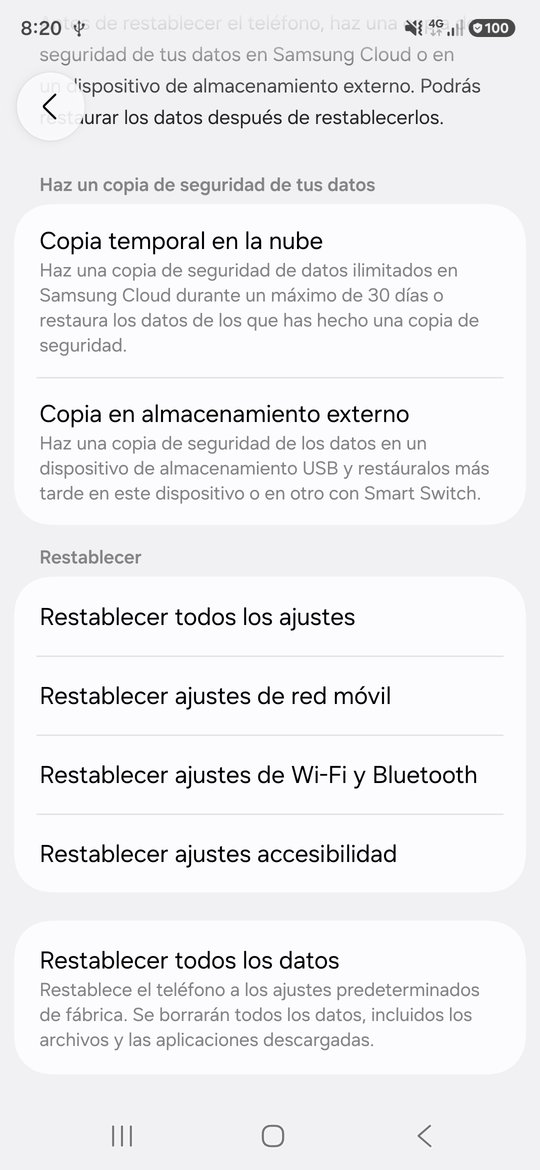
- Scroll to the bottom and tap Factory data reset. Then tap the Reset button and confirm.
On other phones
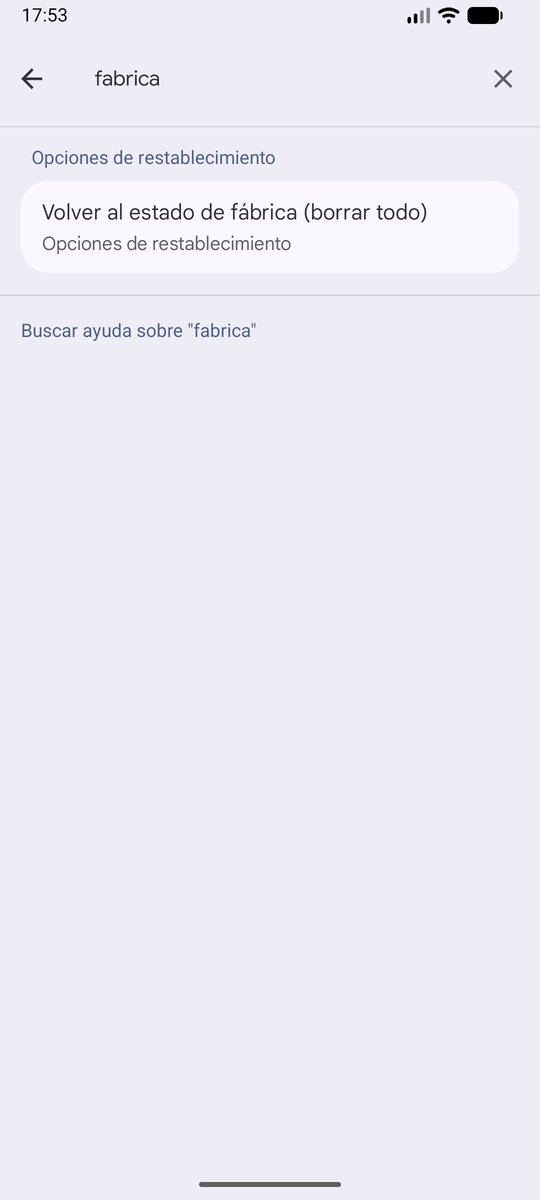
Open Settings, tap the search icon at the top, type factory and choose Erase all data (factory reset). Then tap Erase all data.
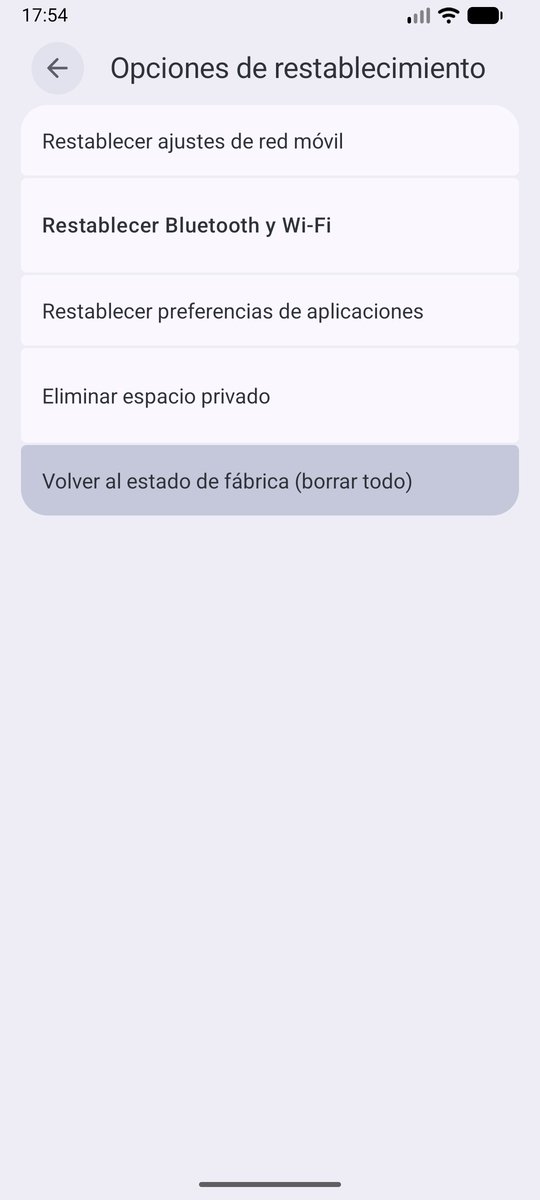
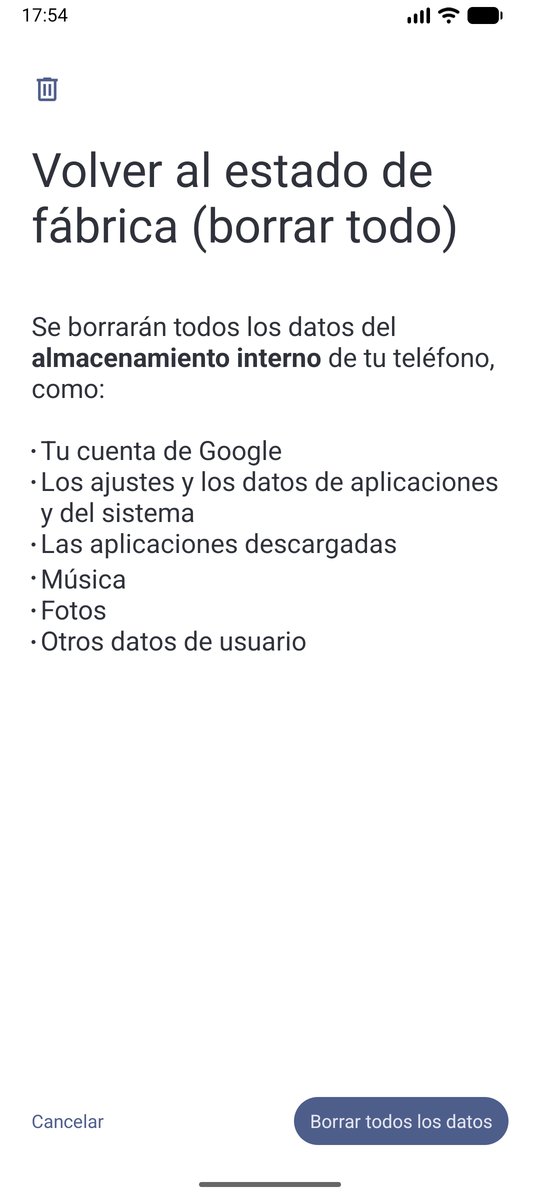
The phone will turn off and take a few minutes to start again.
3Turn the phone on for the first time
When it starts, the setup wizard asks several questions. Answer like this:
| Question | What to do |
|---|---|
| Language | Choose the person's language. |
| Connect to a Wi-Fi network | You can connect or Skip. LlamaditApp turns Wi-Fi off later. |
| Copy apps and data | Don't copy. |
| Google account | Skip. ⚠️ Do not add any account now: if you do, LlamaditApp cannot be activated. You can add one at the end (step 10). |
| Samsung account | Skip. |
| Protect your phone (PIN, pattern, fingerprint, face) | Skip / Not now. ⚠️ Do not set any screen lock: LlamaditApp removes the lock screen so the person never has to unlock anything. |
| Google services, location | You can Accept. Leave location on: the SOS button needs it. |
| Any other question | Skip, Not now or Next. |
When you finish, you will see the phone's normal home screen.
4Remove the SIM card PIN
This way, if the phone turns off and on again, it works on its own without anyone having to type the PIN.
Samsung: Settings → Security and privacy → More security settings → SIM card security and turn off the Lock SIM card switch. It will ask for the current SIM PIN.
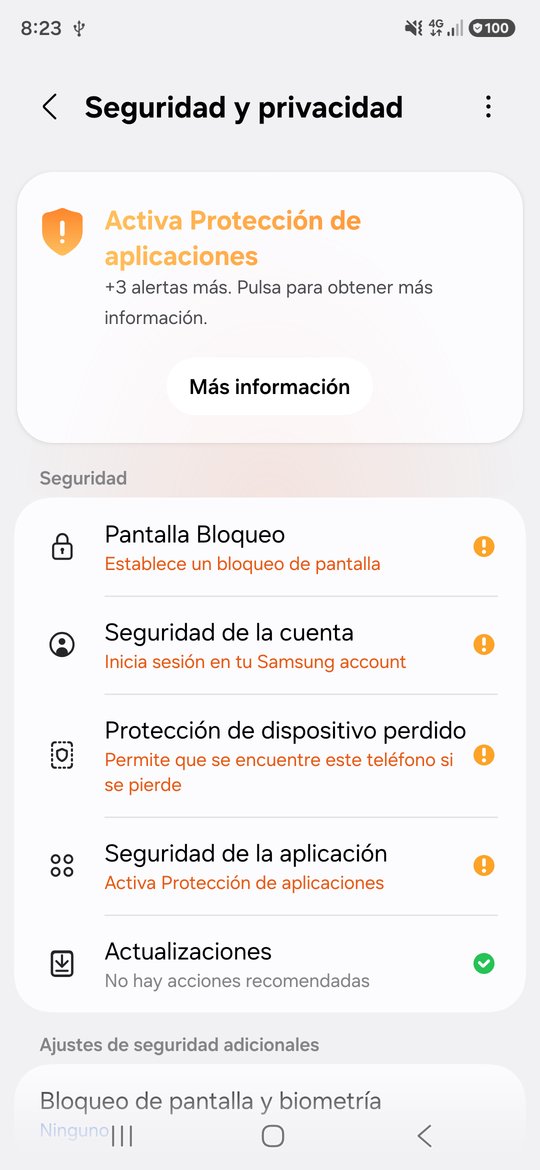
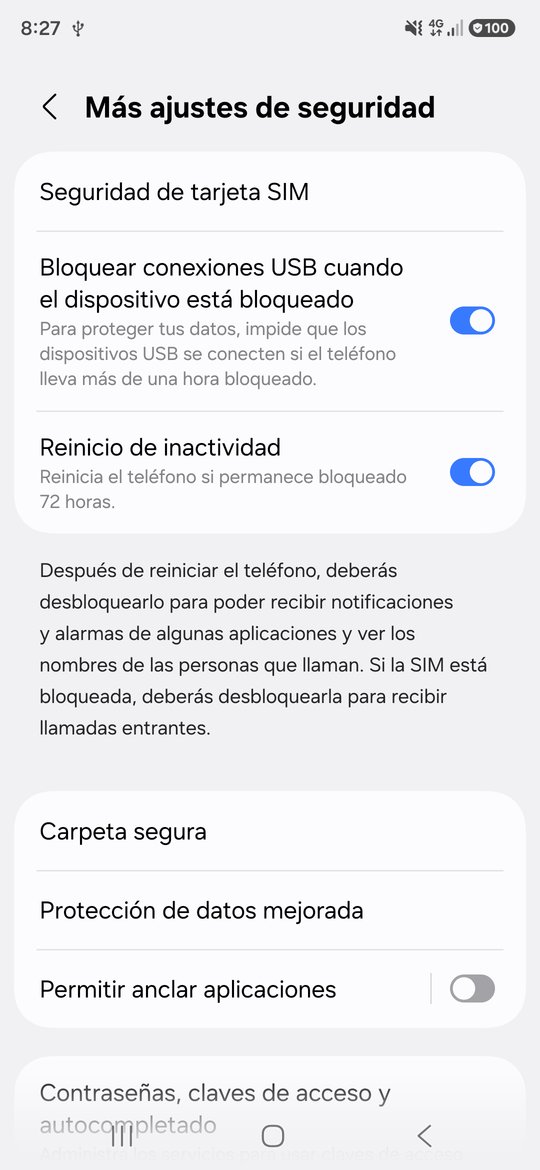
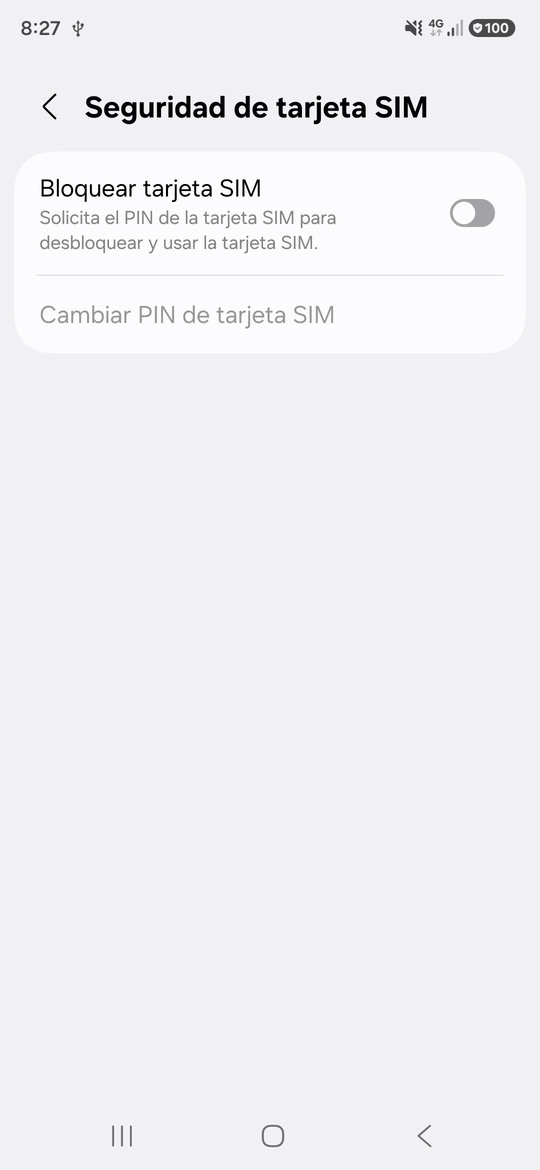
Other phones: in Settings, tap search and type SIM. Look for SIM lock or Lock SIM card and turn it off.
5Turn on "USB debugging"
This permission lets the computer install LlamaditApp. There are three parts.
5.1. Samsung only: turn off "Auto Blocker"
If it is on, it will not let you turn on USB debugging. Settings → Security and privacy → Auto Blocker → Off.
5.2. Turn on "Developer options"
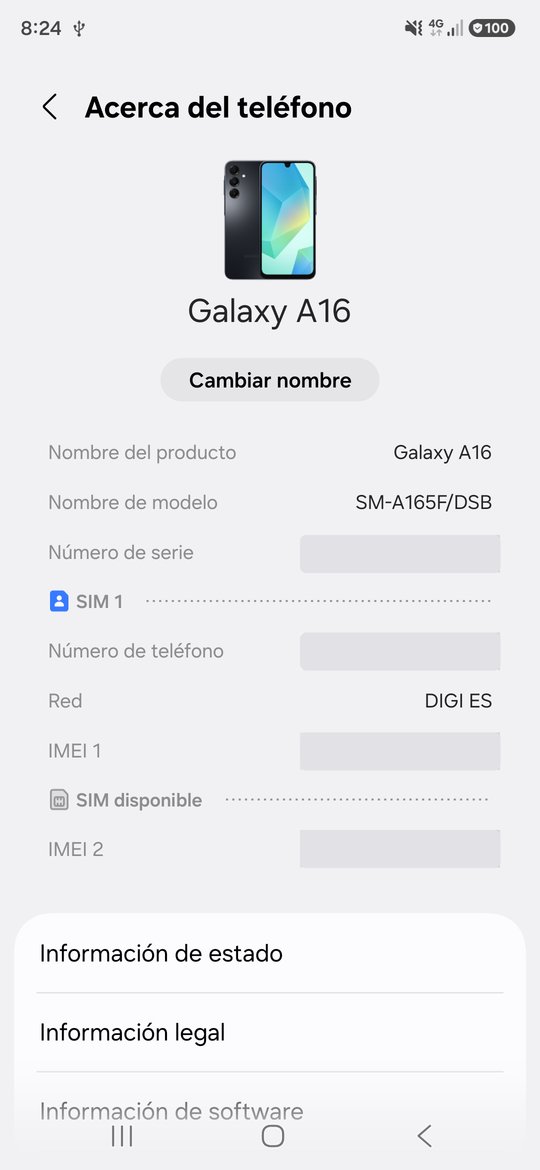
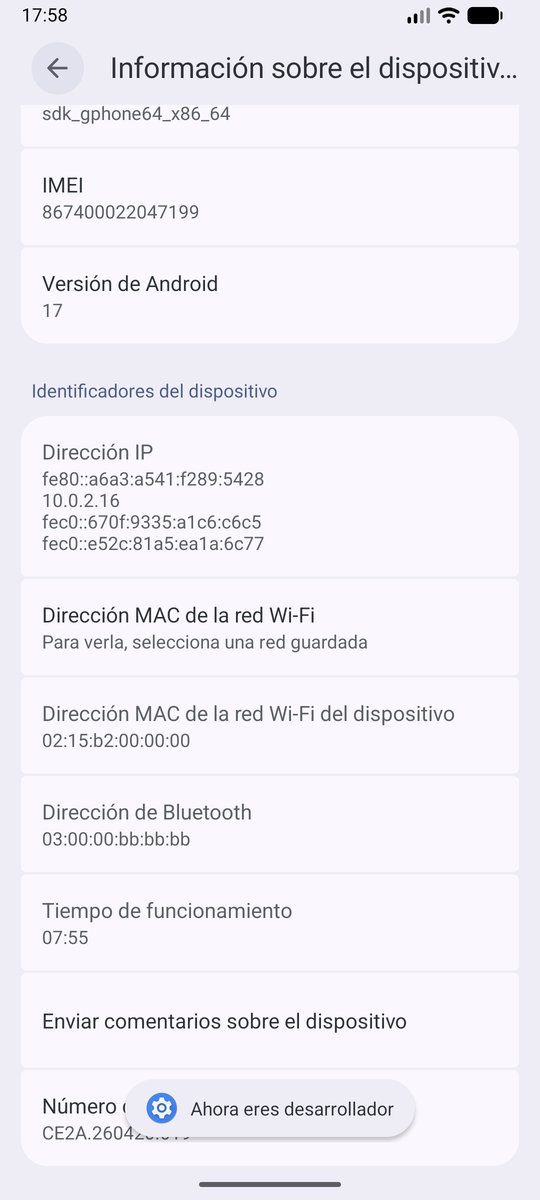
- In Settings, open About phone (on Samsung it is at the bottom of the list).
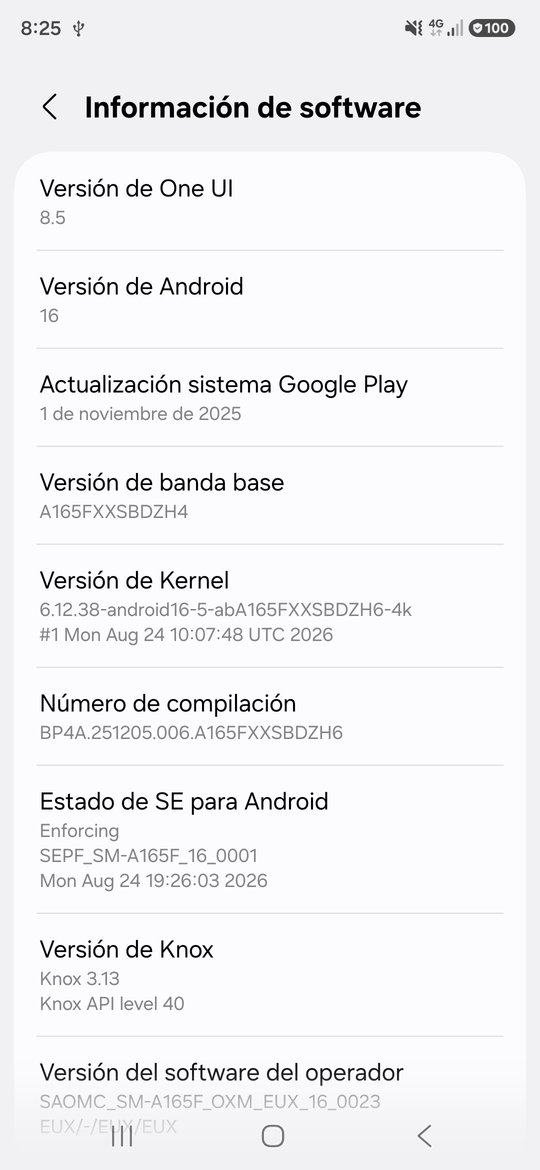
- Open Software information.
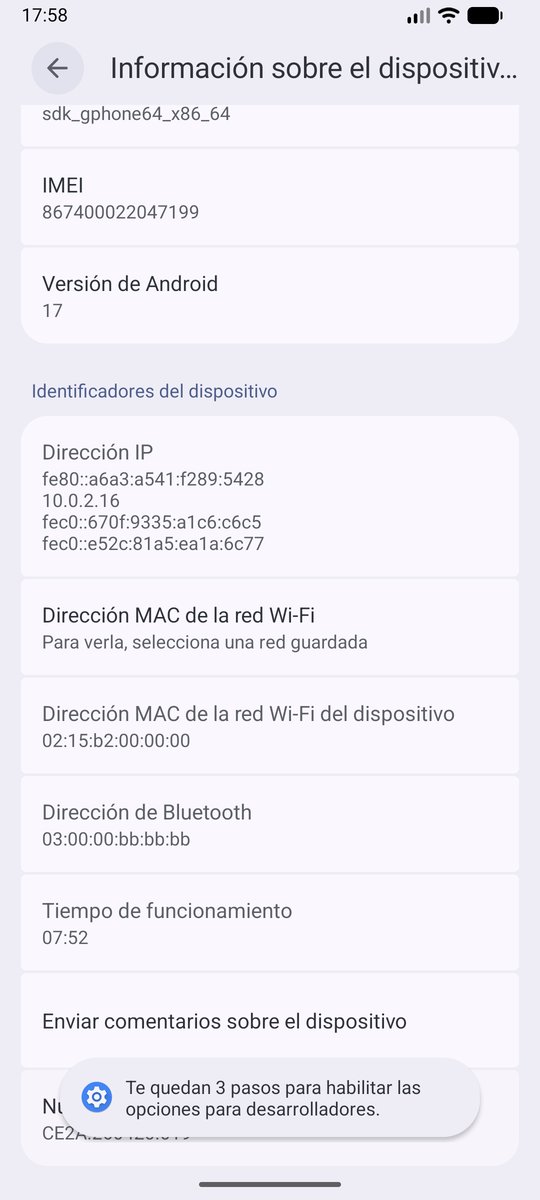
- Find Build number and tap it 7 times in a row. The phone counts down ("You are now 3 steps away…") until it says "Developer mode has been turned on". If it asks for the screen PIN, type it (it should not, since we did not set one).
5.3. Turn on "USB debugging"
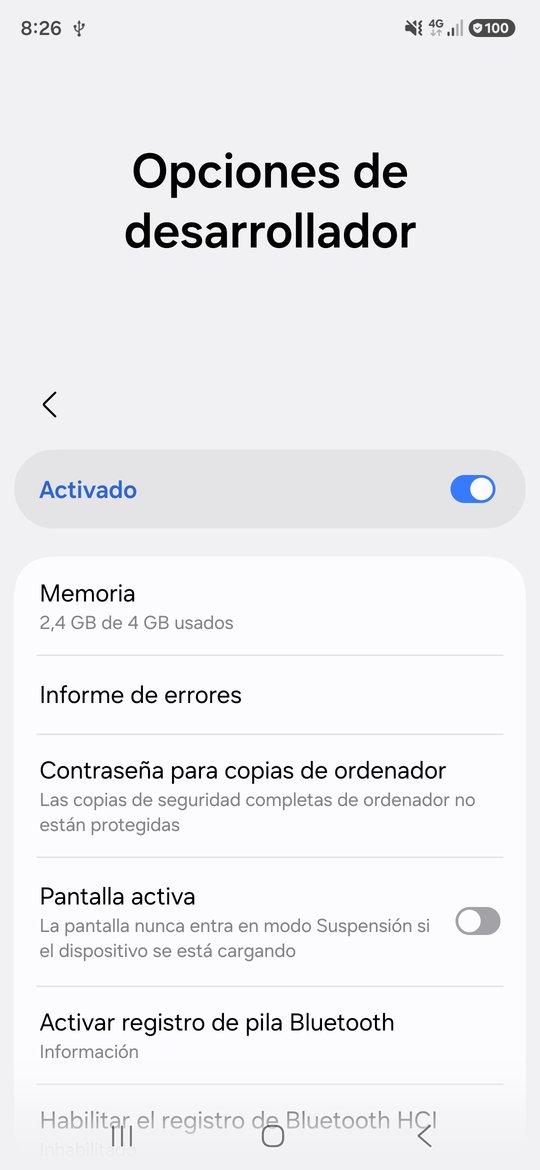
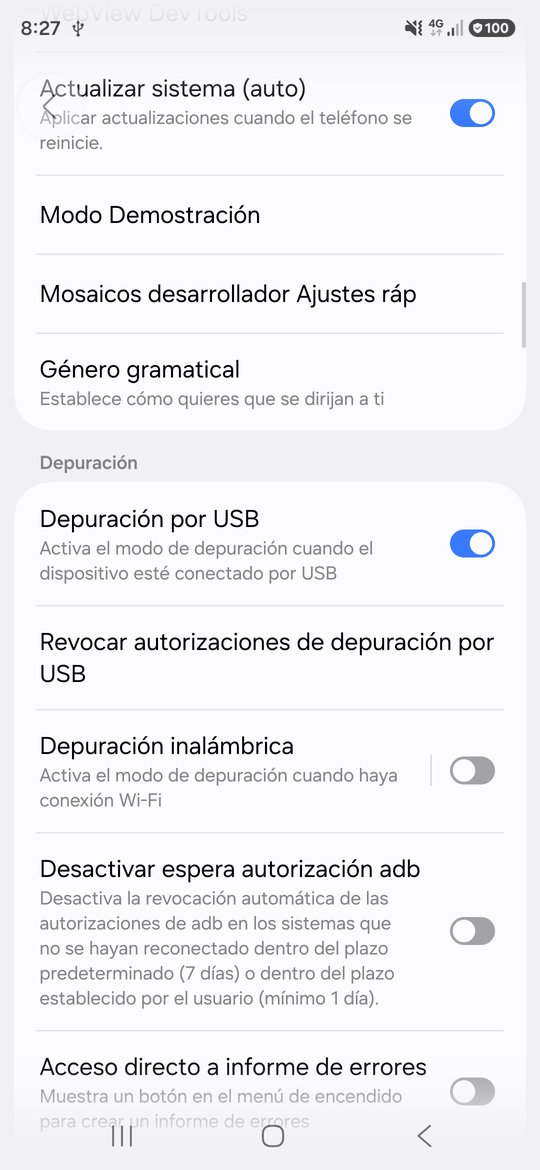
Go back to Settings. Developer options has appeared at the bottom of the list. Open it, scroll down to the Debugging section and turn on USB debugging. Accept the warning that appears.
6Install LlamaditApp from the computer
6.1. Download the installer
On the computer, open this page: github.com/alvsanmun/LlamaditApp/releases/latest
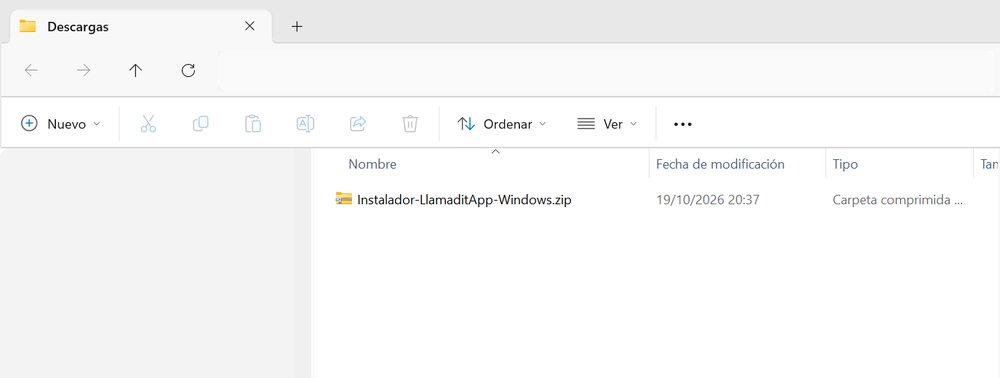
Scroll down to Assets and click Instalador-LlamaditApp-Windows.zip. It downloads to your Downloads folder.

6.2. Unzip the installer
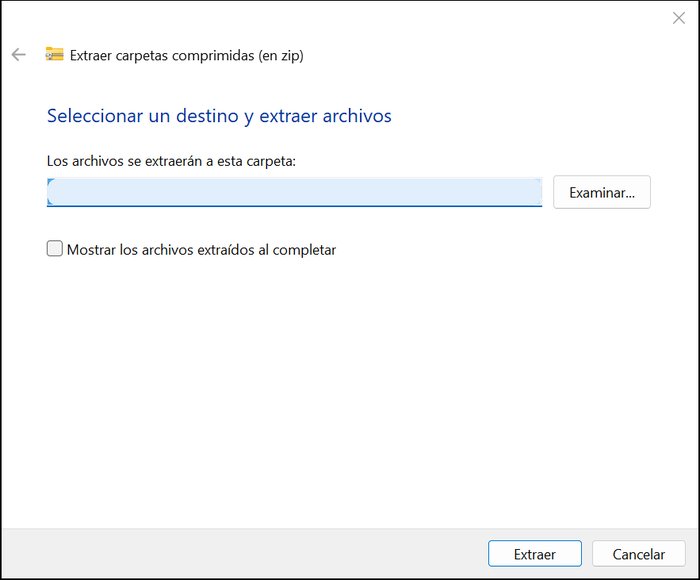
- Open the Downloads folder (in Windows File Explorer).
- Right-click Instalador-LlamaditApp-Windows.zip and choose Extract All…
- Click Extract.
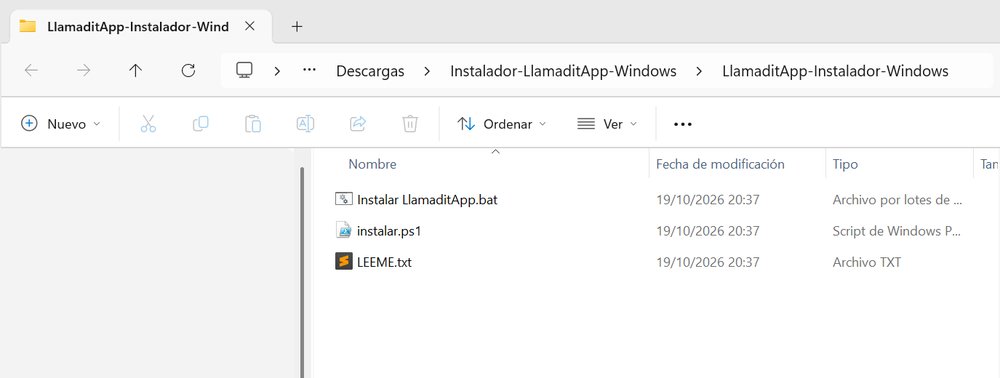
A folder with three files opens:
6.3. Connect the phone
- Connect the phone to the computer with the USB cable.
- If the phone asks what to use USB for, choose Transferring files.
6.4. Run the installer
- Double-click Instalar LlamaditApp.bat.
- If Windows shows "Windows protected your PC", click More info and then Run anyway. (Windows warns about any program it does not know; the installer is safe and its code is public.)
- A black window opens. Read it and press the Enter key.
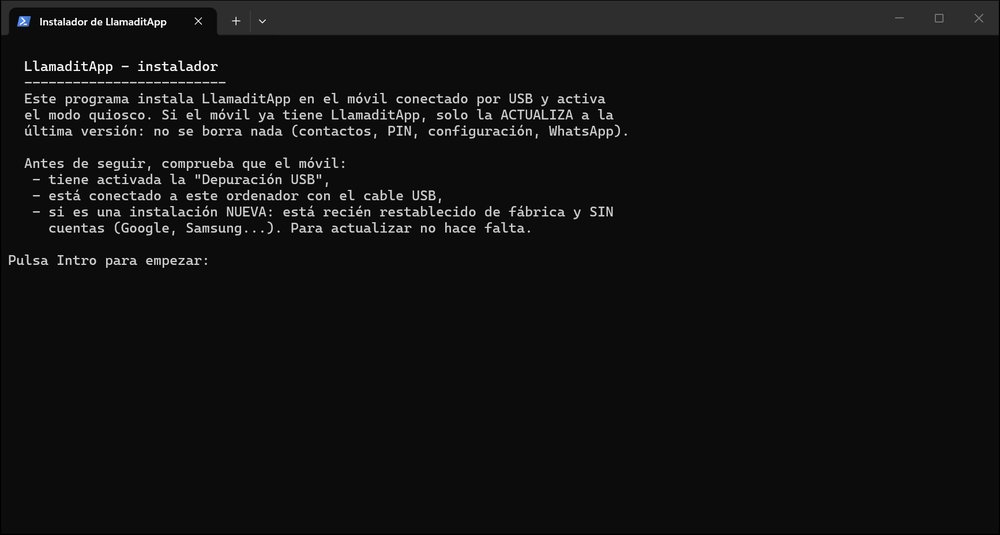
- Look at the phone: the message "Allow USB debugging?" appears. Tick Always allow from this computer and tap Allow.
- Wait. The installer downloads what it needs and installs LlamaditApp. It takes a minute or two. At the end you will see "¡Listo!" (Done!):
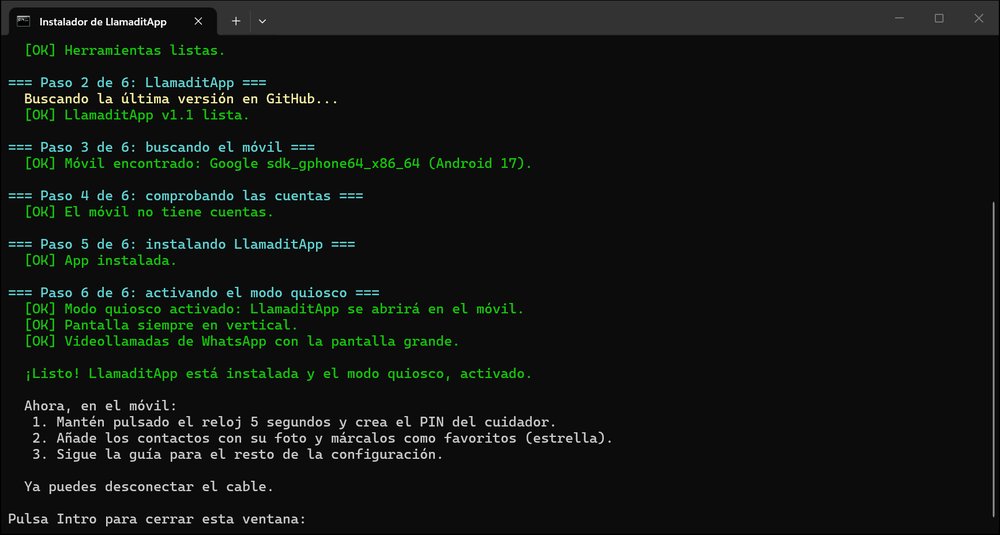
On the phone, LlamaditApp opens automatically and you can no longer leave it:
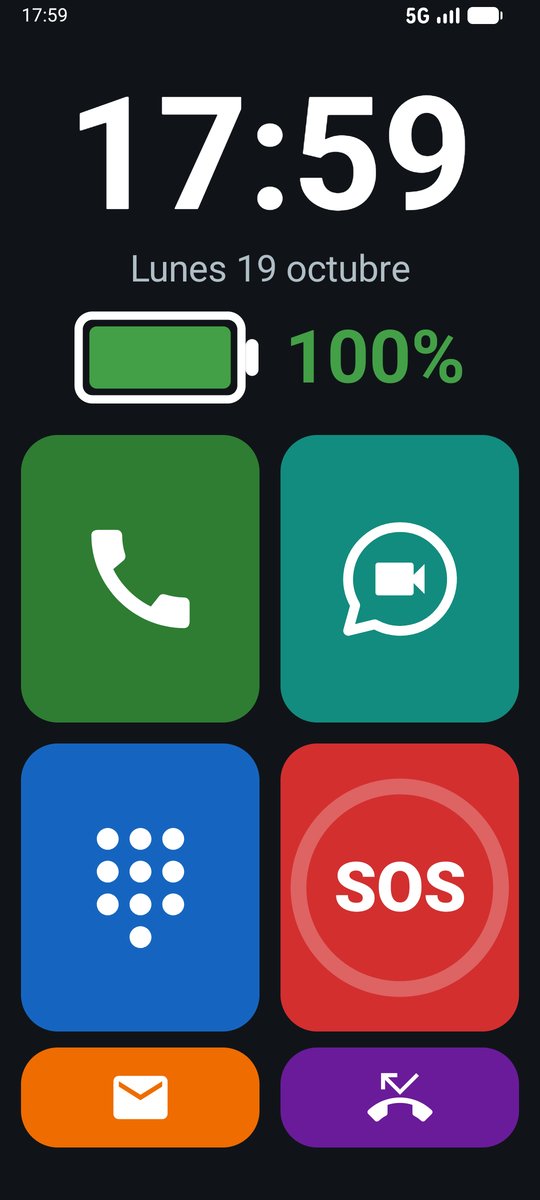
You can now unplug the cable. Press Enter to close the installer window.
7Create the caregiver PIN
The caregiver panel is where everything is set up. It is hidden so the person does not open it by accident.
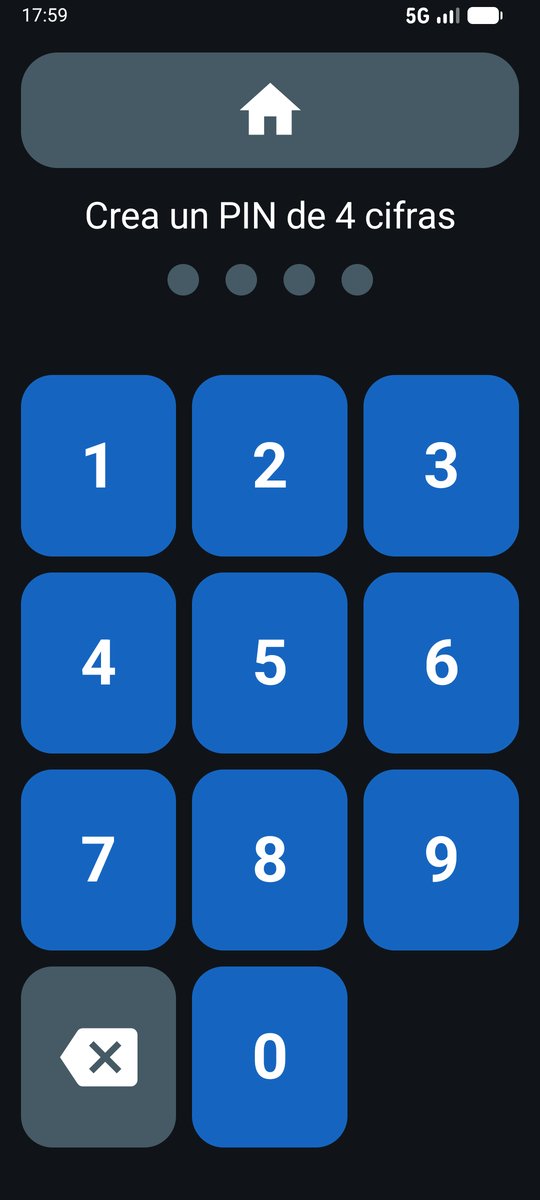
- Press and hold the time (the big clock) for 5 seconds, until the phone vibrates.
- Type a 4-digit PIN that only you know.
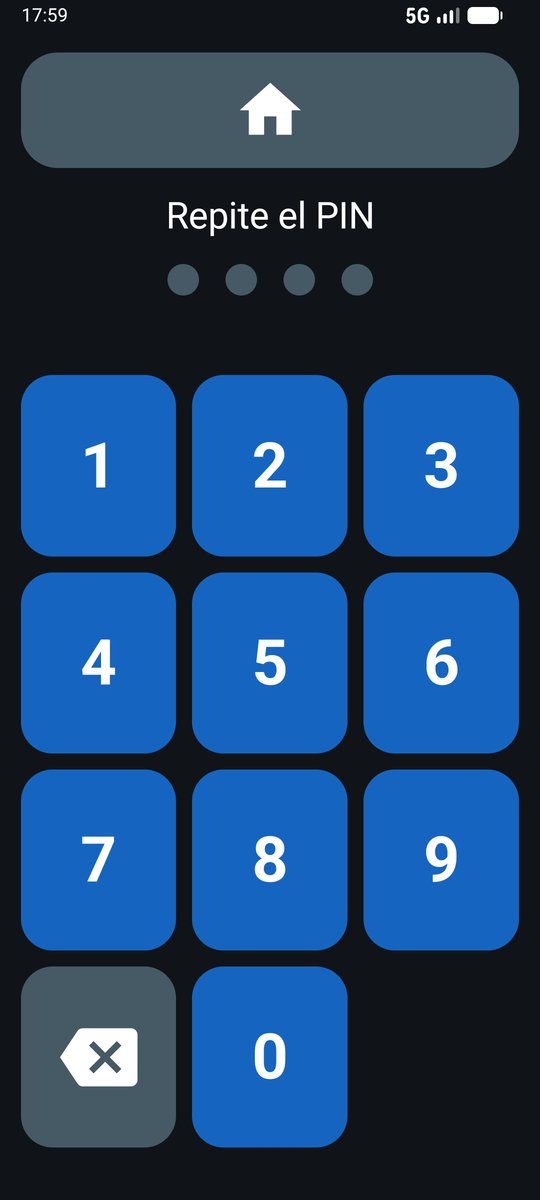
- Type it again to confirm it.
8Add contacts with their photos
The person will only see the photos of contacts marked with a star (favourites). There are two ways to add them, and they can be combined:
- A. On the phone itself, from the caregiver panel.
- B. From any computer or phone, with a Google account. Changes arrive automatically.
Option A: on the phone itself, from the panel
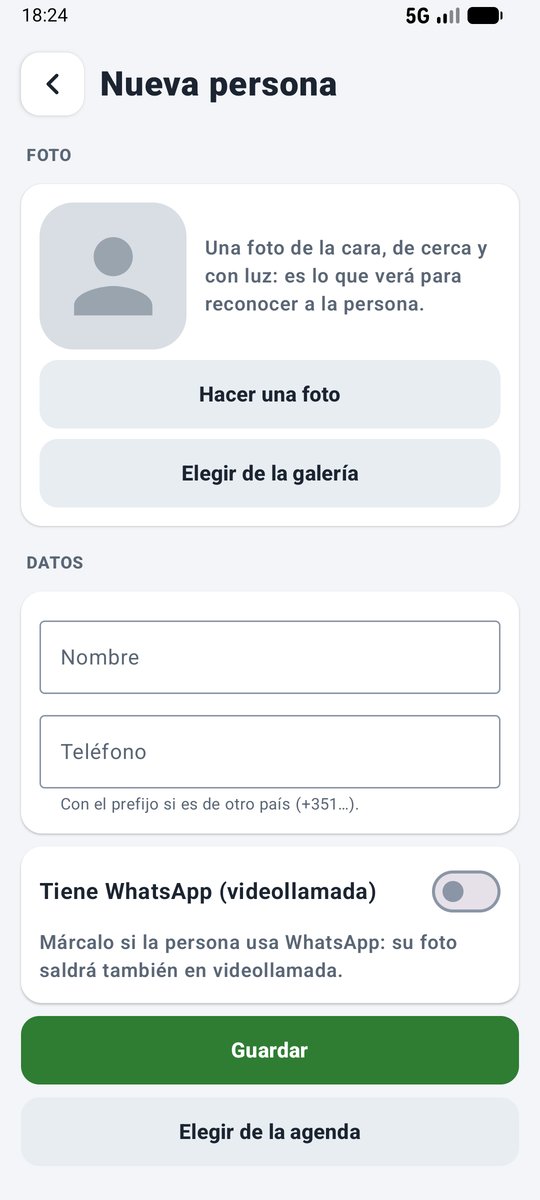
- In the caregiver panel, open the People section and tap Add a person (the button with a dashed border). The New person form opens, without leaving LlamaditApp.
- The photo: tap Take a photo (to take it now) or Choose from the gallery. It is cropped to a square automatically.
- Type the name and phone number (with the country code if it is from another country, for example +44).
- If the person uses WhatsApp, turn on Has WhatsApp (video call).
- If the phone has a Google account, choose whether to save it there (recommended: it is not lost if the phone breaks) or Only on this phone.
- Tap Save. The person now appears in People and on the call screen, with the star ★ (favourite) already on.
- If the number is already in the phone book, the form says so and offers Add … to the list instead of creating another person.
- Choose from the phone book searches the contacts already on the phone and adds the one you pick.
- To change the photo, name or number later: tap the person in People → Change photo, name or phone number.
Repeat for each person (4 to 6 is ideal).
Option B: from a Google account
The easiest option if you do not live with the person: you add or change contacts from any computer or phone and they reach LlamaditApp automatically. It can be combined with option A.
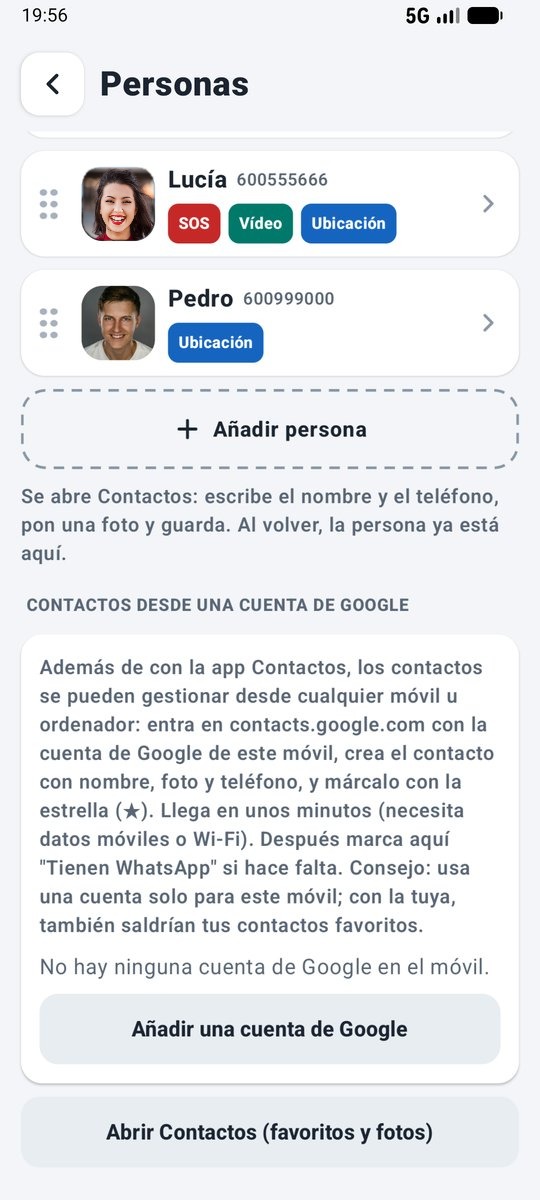
- Create a Google account just for this phone (for example, name.llamadita@gmail.com) from your computer, at accounts.google.com. If you use your personal account, your own favourite contacts will also appear on the phone.
- In the caregiver panel, open People and, at the very bottom, under Contacts from a Google account, tap Add a Google account and sign in with that account. Because the phone is managed by LlamaditApp, Google calls it a "work account": that is normal; type the email anyway.
- Go back to LlamaditApp with the back arrow: the panel stays open and kiosk mode stays paused until you leave it, so the sign-in is not interrupted. The account appears in the panel with the number of favourites (★) it has. Leave Sync the contacts automatically on.
- From any computer or phone, go to contacts.google.com with that account and create the contact: name, phone number and photo (a close-up of the face).
- Mark it with the star ☆ (favourite). Without the star it will not appear in LlamaditApp.
- It reaches the phone in a few minutes (it needs mobile data or Wi-Fi). To avoid waiting, tap Sync now in the panel.
9Set up the caregiver panel
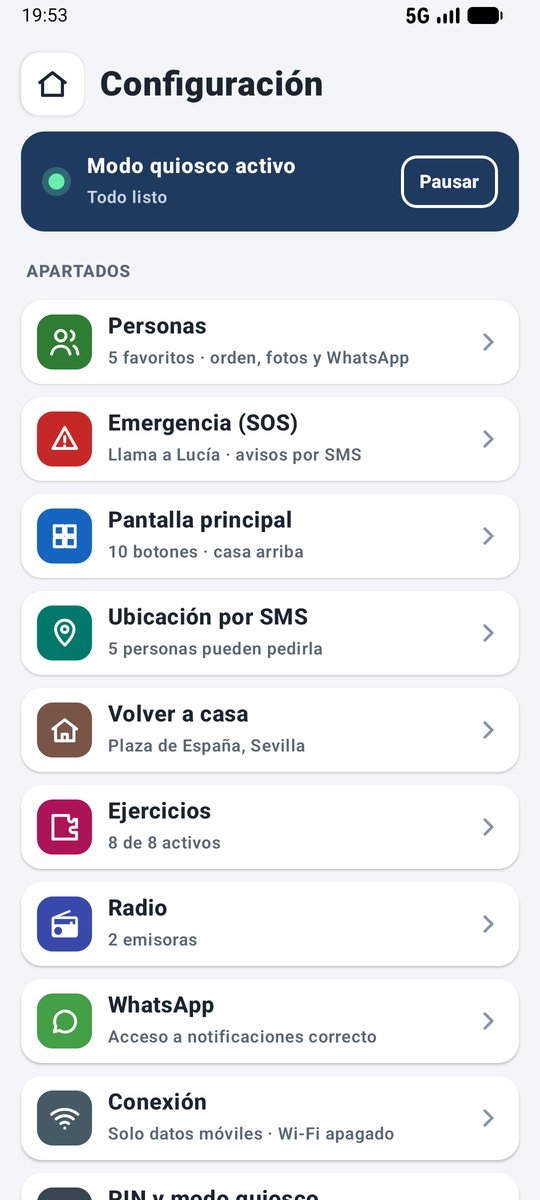
The panel starts with a front page: at the top, a dark blue card says whether kiosk mode is on (with a button to pause it) and how many things there are to review. Below are the sections; each one shows a summary of its status and, if something is missing, says so in amber (for example, "The photo of the front door is missing"). Tap a section to open it and the arrow at the top to go back.
Start with People:
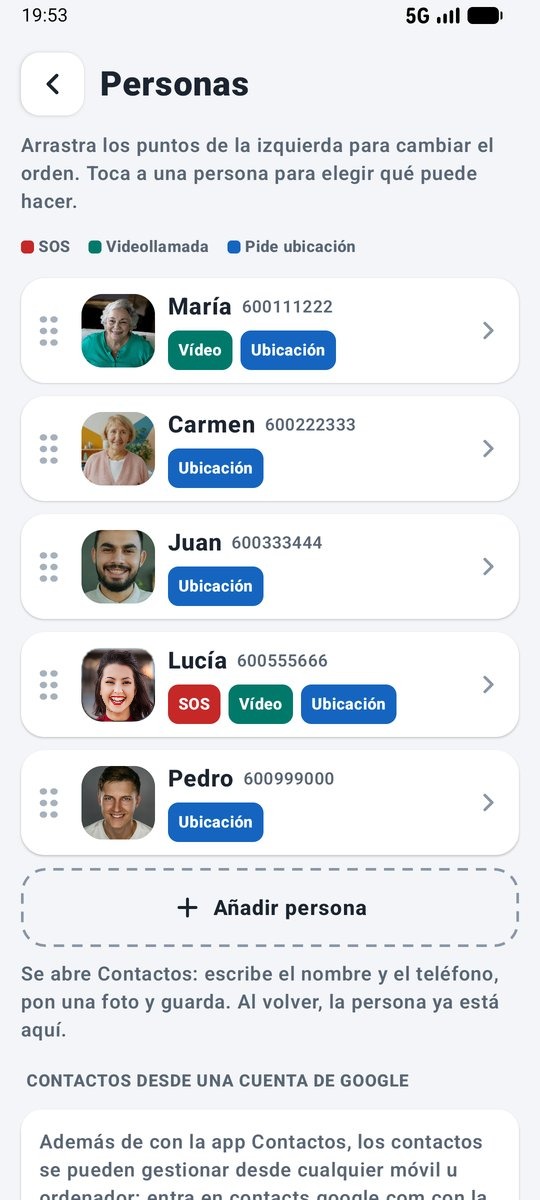
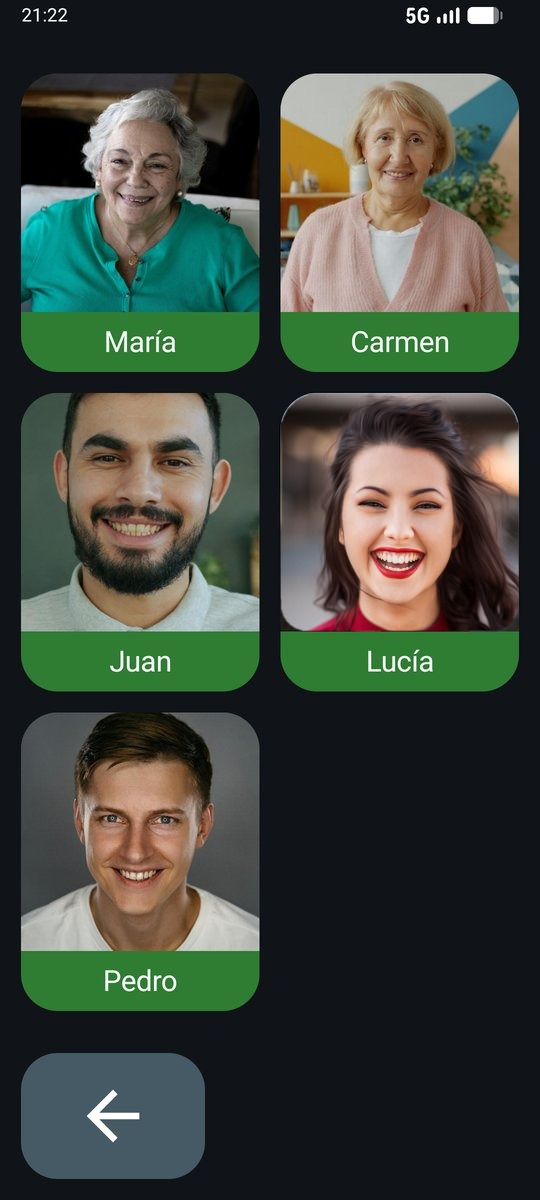
- Order: drag the six dots on the left of each person to move them up or down. Put the person they call most at the top; this is the order used in Call and Video call.
- What each one can do: tap a person and use the switches to choose whether they are the emergency contact (SOS) (who the red button calls and alerts), whether they have WhatsApp (for video calls, see step 10) and whether they can ask for the location by SMS by texting the keyword (LOCATION if the phone is in English, UBICACION in Spanish…).
- The coloured tags sum it up at a glance: SOS, Video, Location and, in orange, No photo.
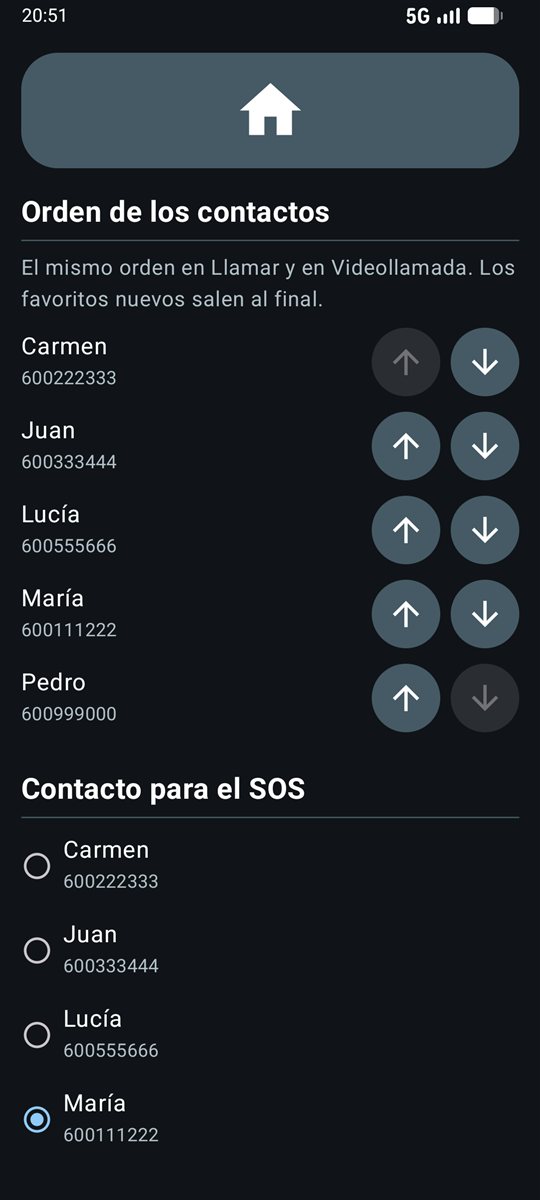
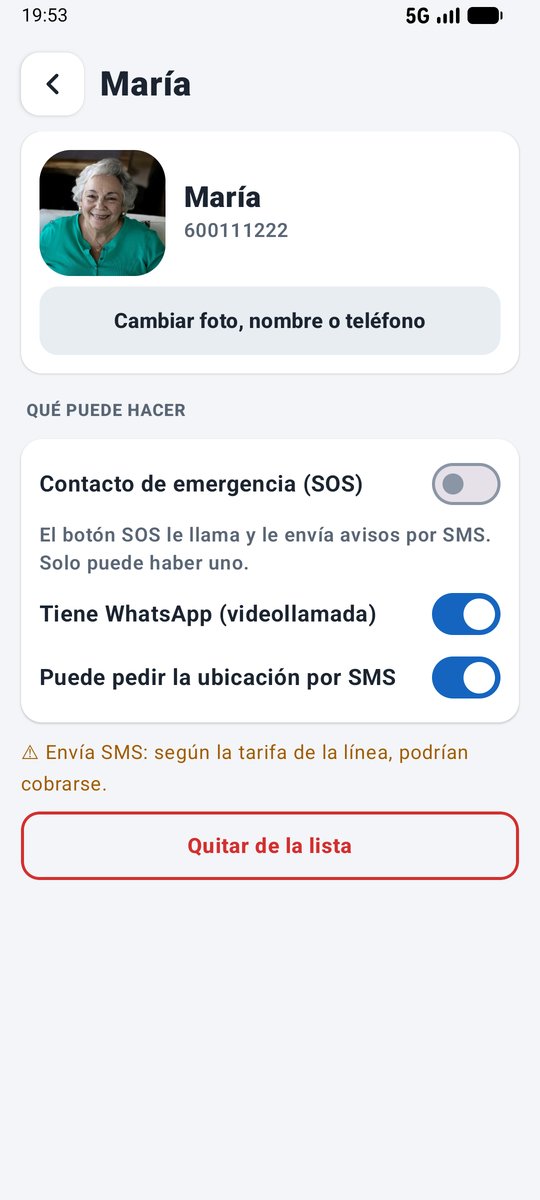
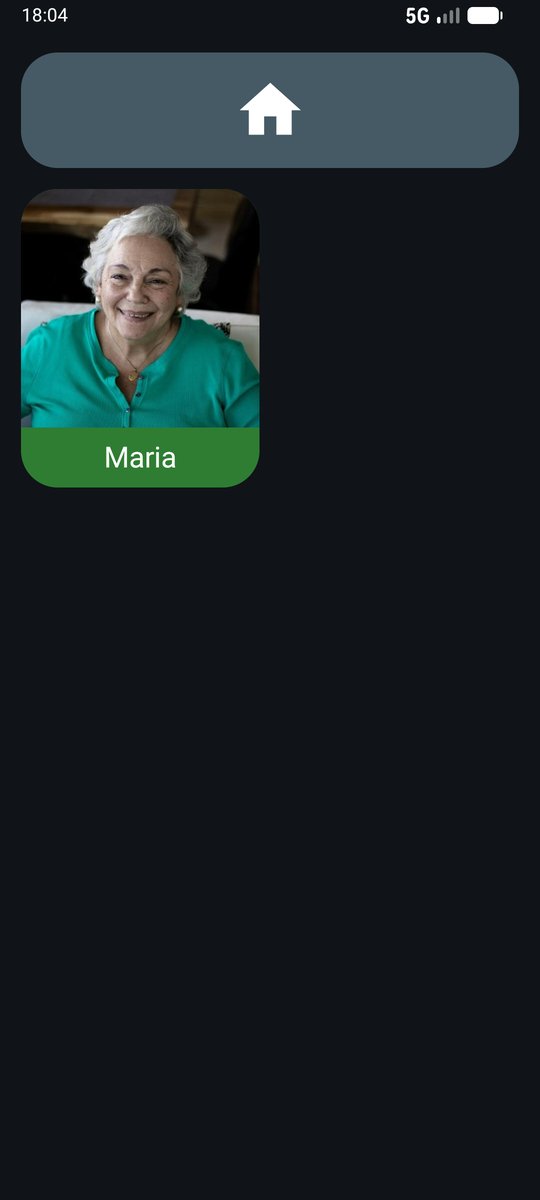
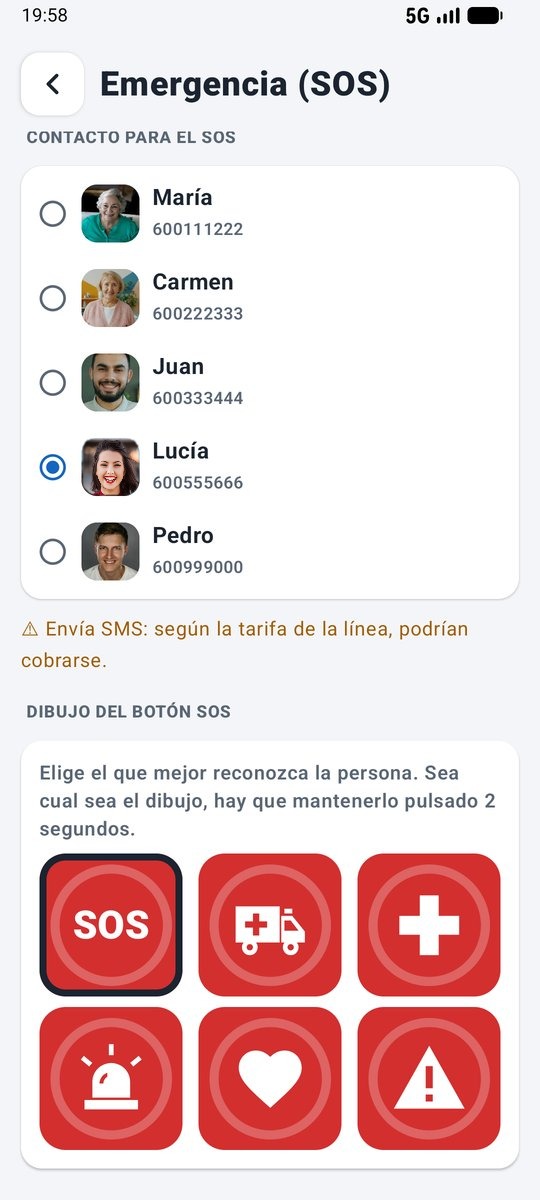
In Emergency (SOS) you can also choose the SOS contact, and in Location by SMS, who can ask for it and which keywords to use.
9.1. Tailor the home screen
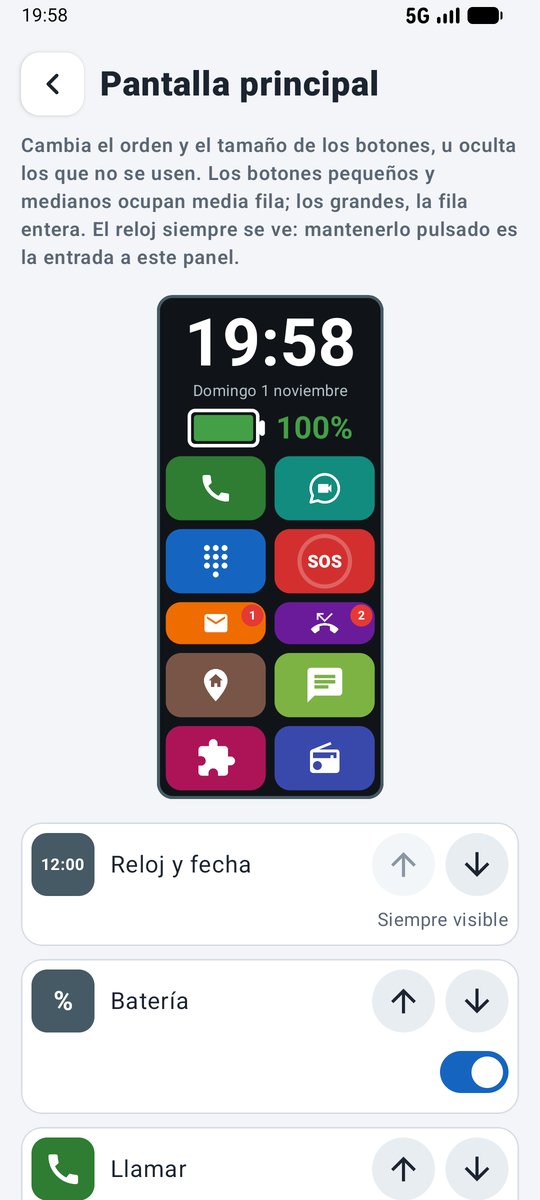
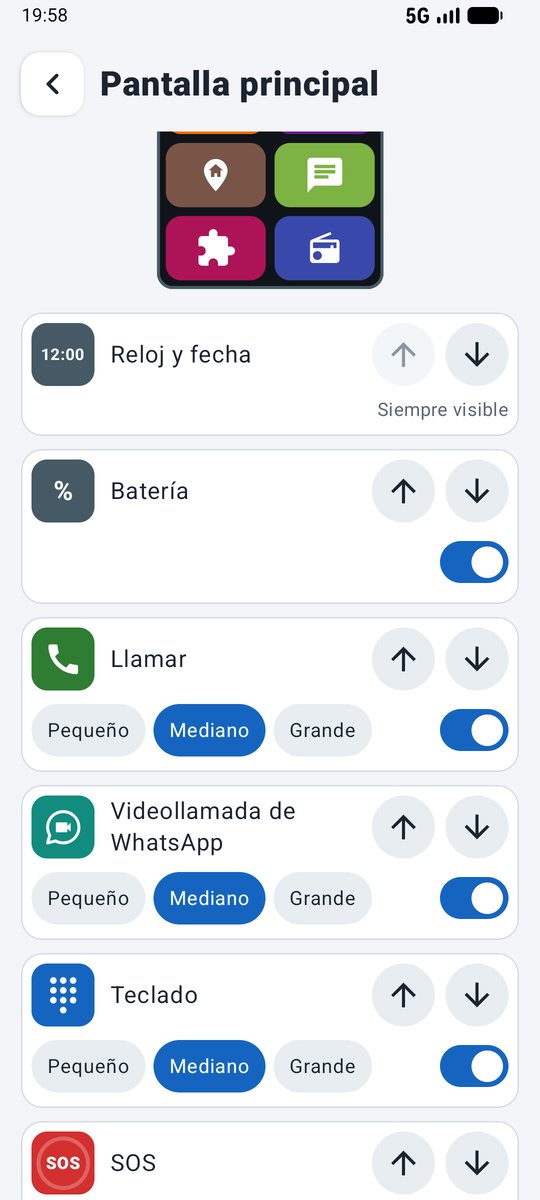
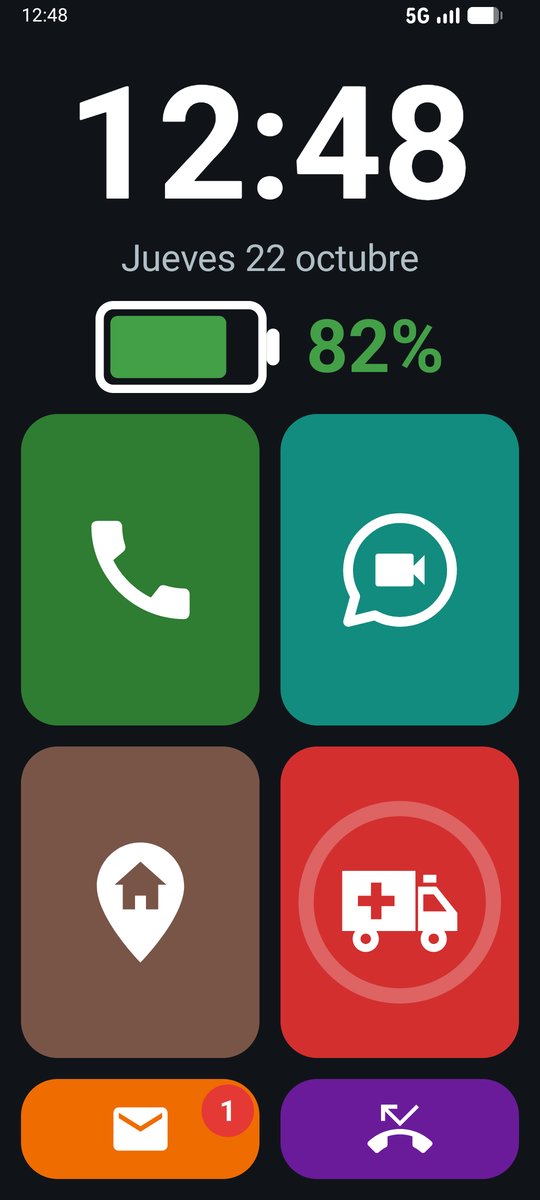
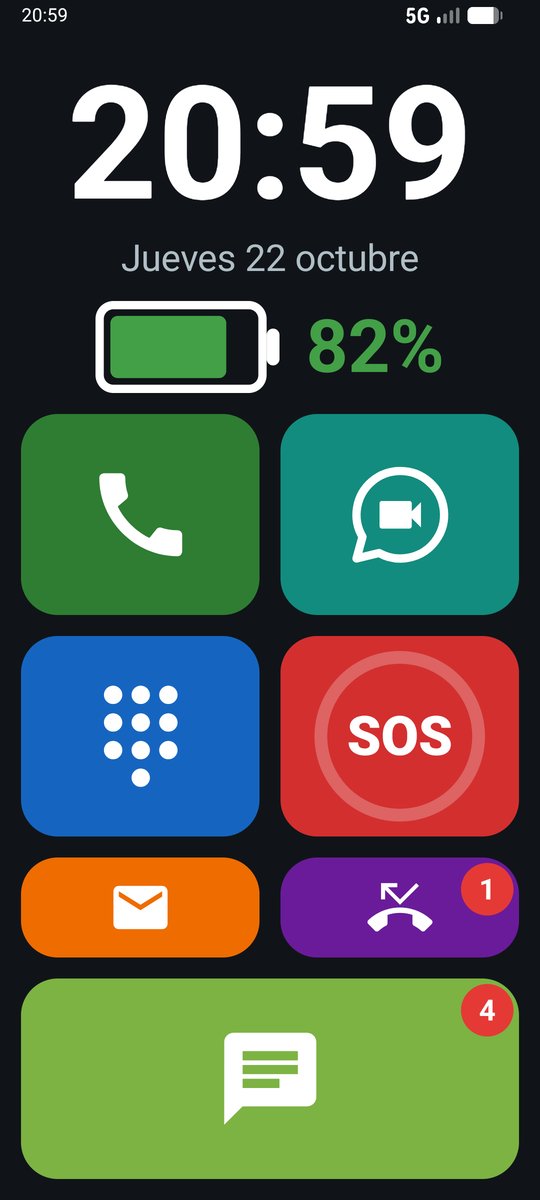
In the Home screen section there is a preview of what the person will see. For each button:
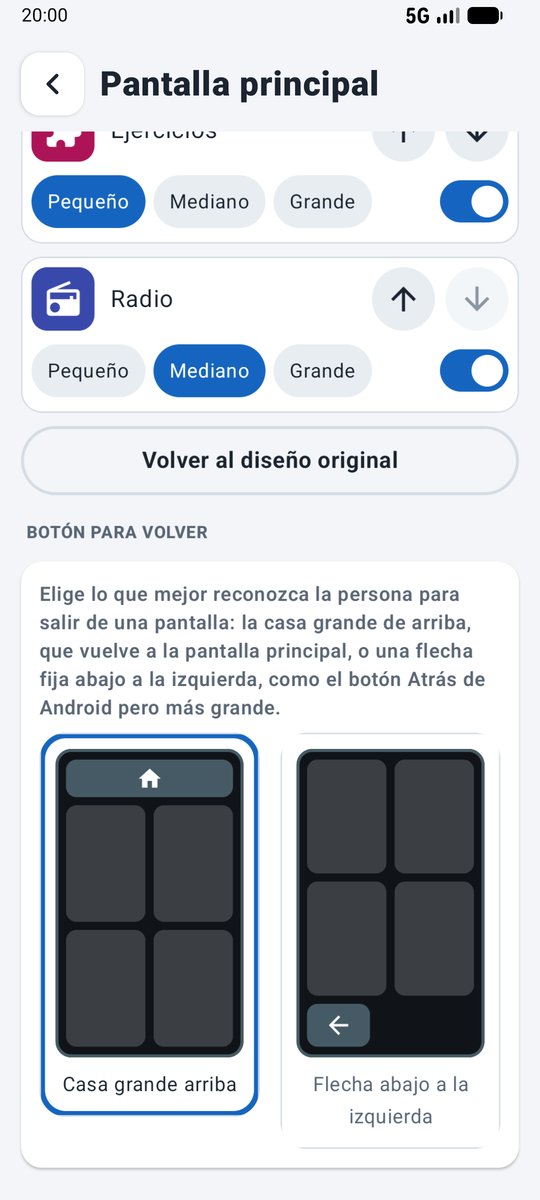
- ↑ ↓ to move it (the clock and battery too).
- Small, Medium or Large: small and medium take half a row; large, the whole row.
- The switch shows or hides it. Hide what the person will not use: the fewer buttons, the easier.
The clock is always shown, because it is the way into this panel, but it can be moved. Restore the original layout puts everything back as it was. In the Emergency (SOS) section, at the bottom, under Picture of the SOS button, choose what the person recognises best: the letters SOS, an ambulance, a cross, a siren, a heart or a warning sign.
Further down, in Button to go back, choose how the person will leave each screen: the Large house at the top (the default) or the Arrow at the bottom left, similar to the Back button on phones. If they are used to that arrow, the second option will feel more familiar. The change is visible straight away.
9.2. Go home (optional)
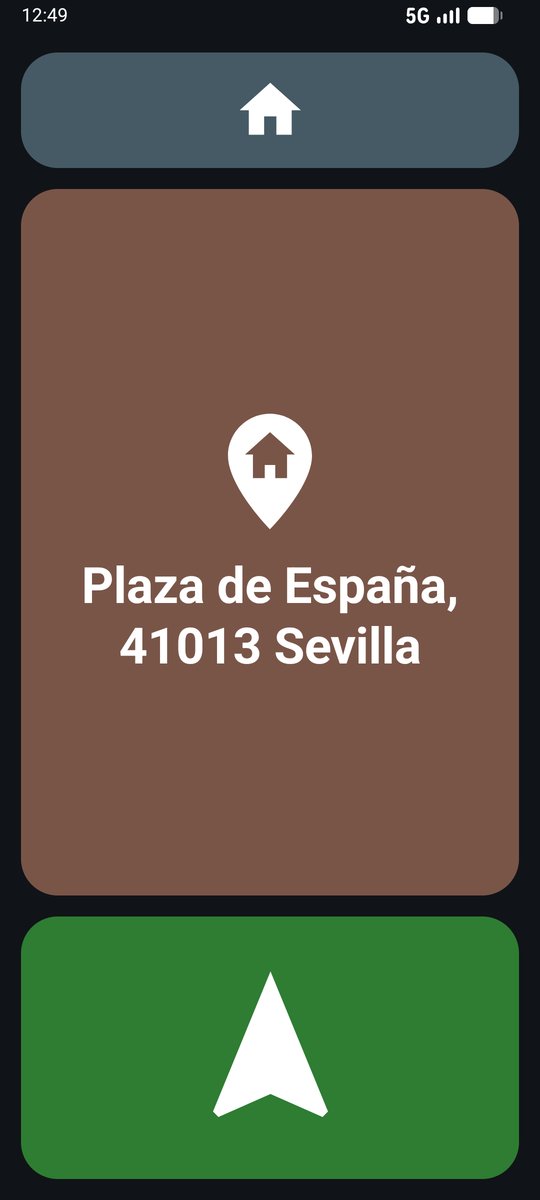
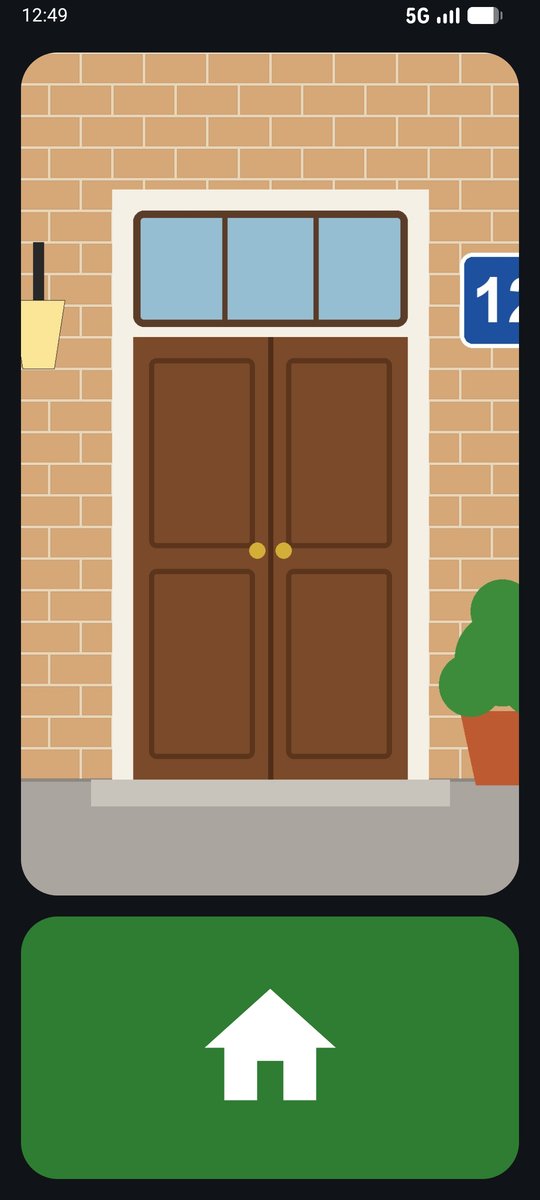
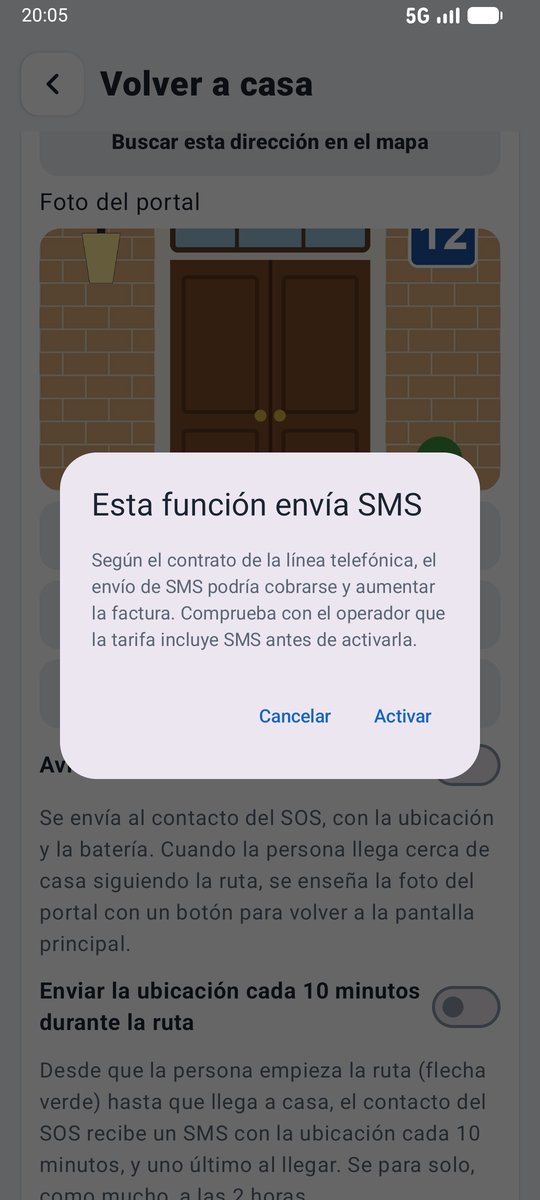
A button for when the person gets lost in the street: it shows the home address in large letters (for the police or a neighbour) and an arrow that starts a walking route on Google Maps with voice guidance. On arrival, it shows the photo of the front door. Everything is set up in the Go home section.
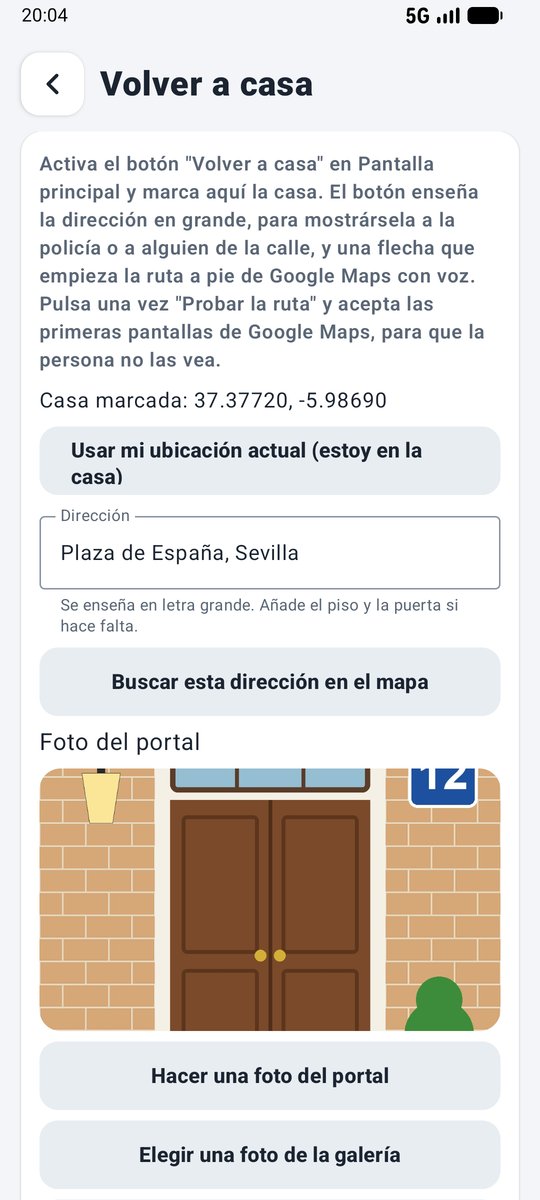
- Mark the house. When you are there, tap Use my current location (I am at the house): the address fills itself in. If you are not there, type the address and tap Find this address on the map.
- Check the address and add the floor and flat number (for example, 12 High Street, Flat 3B). This is what will be shown in large letters.
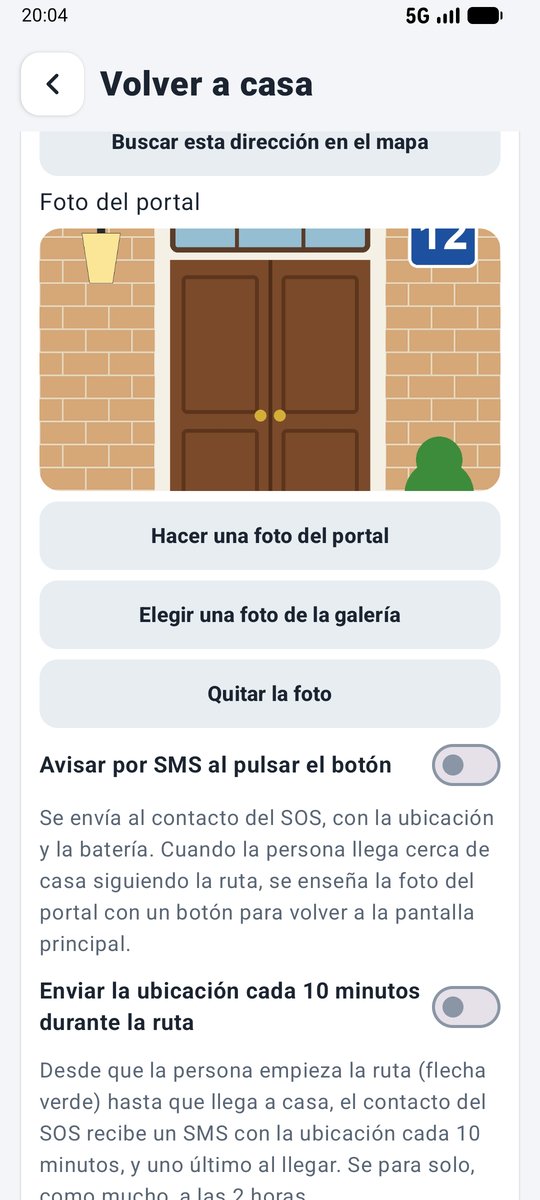
- Front door photo: tap Take a photo of the door and take it from the pavement, in daylight, as the person would see it when arriving: the door, the number and something recognisable. You can also choose one from the gallery.
- SMS alerts to the SOS contact:
- Warn by SMS when the button is pressed (on by default): tells them the person wants to go home, with their location.
- Send the location every 10 minutes during the route (off by default): during the journey, with a final SMS on arrival.
- Tap Try the route and accept the Google Maps welcome screens (only the first time), so the person never sees them.
- Download the city map so the route works without data: briefly turn on Wi-Fi (section 9.3), tap Try the route, close the navigation with the X, tap the profile picture (top right) → Offline maps → Select your own map, fit the city in the frame and tap Download.
- In the Home screen section, turn on the Go home switch.
9.3. Wi-Fi (optional)
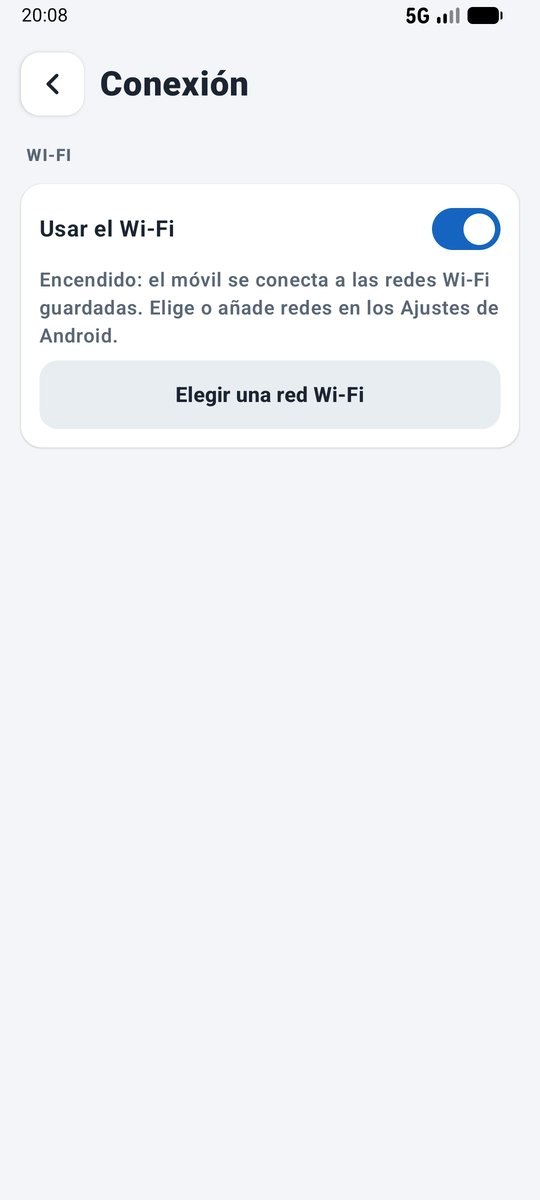
By default the phone uses only the SIM: Wi-Fi is off and nobody can turn it on. If there is Wi-Fi at home, in the Connection section, turn on Use Wi-Fi and tap Choose a Wi-Fi network to connect. When turned off it is locked again; the network is remembered for next time.
9.4. Full WhatsApp (optional)
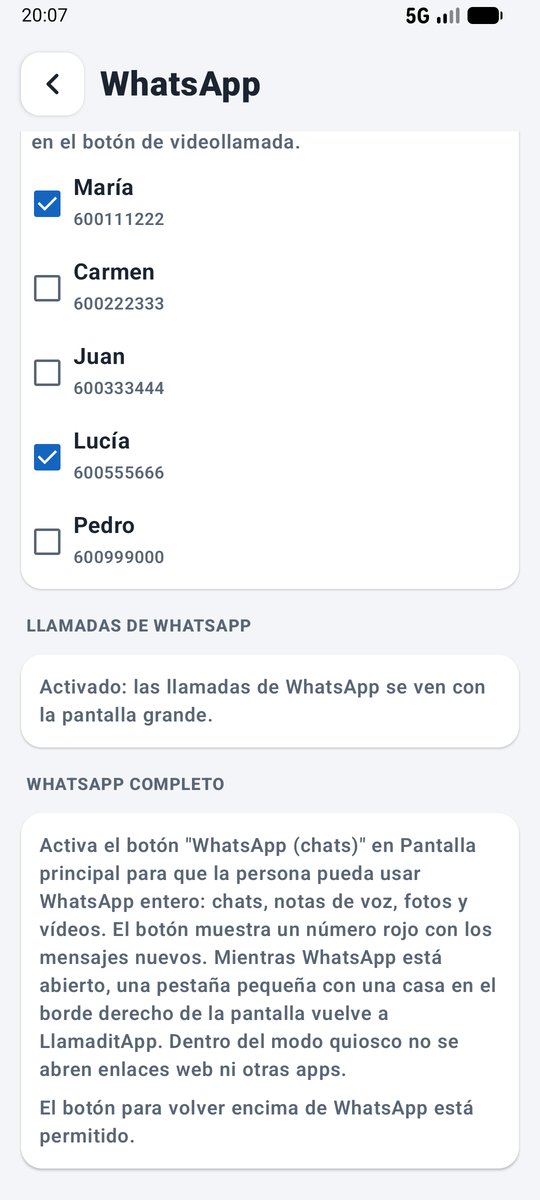
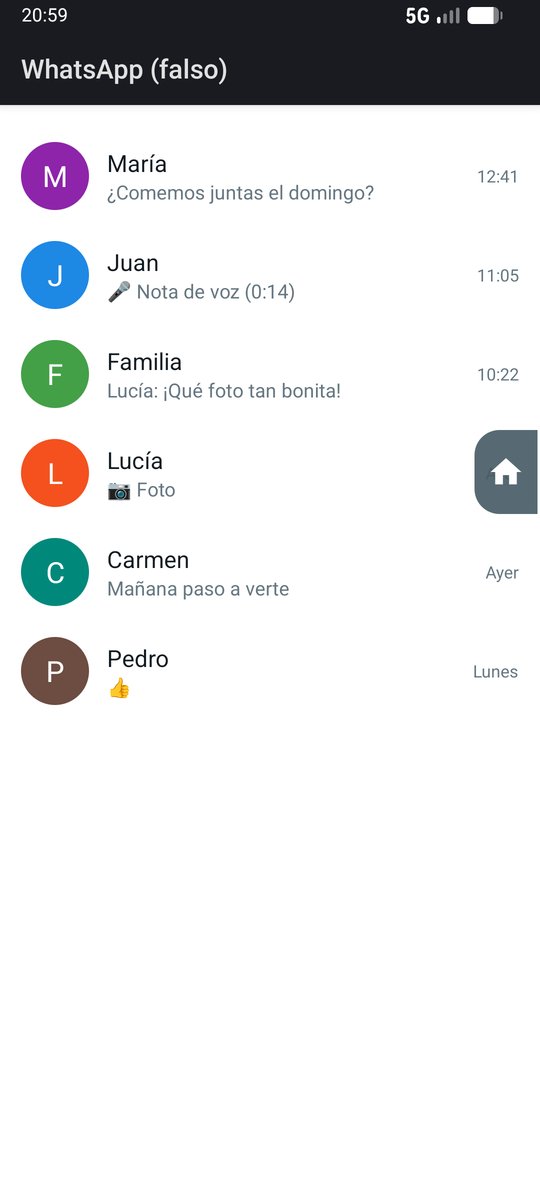
Besides video calls, the person can use the whole of WhatsApp (chats, voice notes, photos and videos) with a separate button. WhatsApp must be installed (step 10).
- In the Home screen section, turn on the WhatsApp (chats) switch and place it where you want.
- In the WhatsApp section, at the bottom, under Full WhatsApp, check that it says "The button to go back over WhatsApp is allowed." If not, tap Allow the button to go back, tap LlamaditApp, turn on the switch and go back.
- Try it: the light green button opens WhatsApp, and the tab with the house on the right edge goes back to LlamaditApp.
9.5. Exercises (optional)
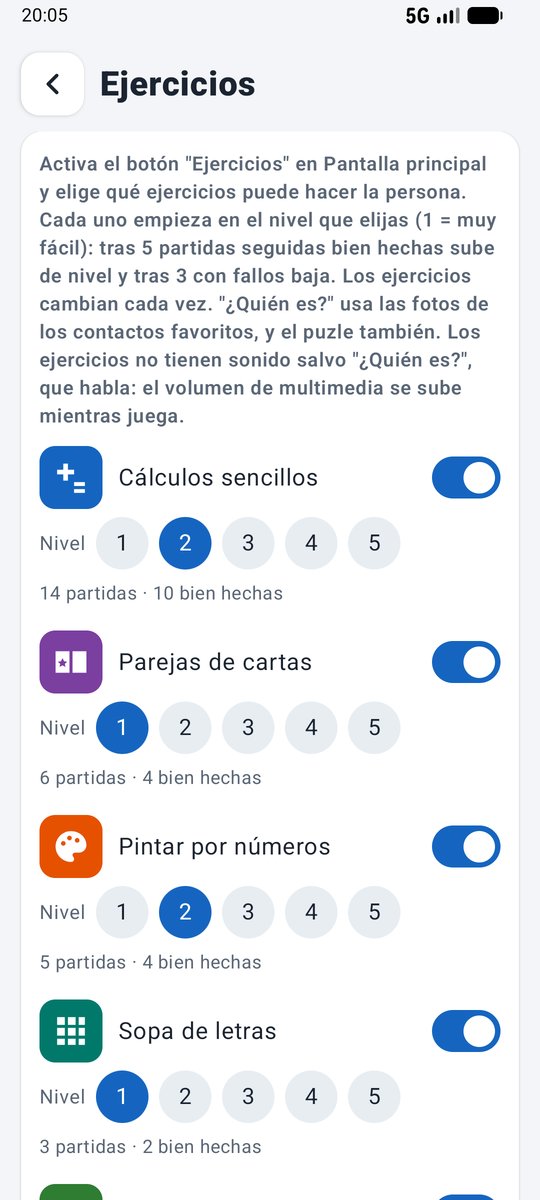
Eight exercises for memory, attention and arithmetic: simple maths, pairs of cards, paint by numbers, word search, "Who is it?" (with family photos), repeat the sequence, counting money and a photo puzzle.
- In the Home screen section, turn on the Exercises switch and place it where you want.
- In the Exercises section, turn off the ones that will not suit the person (for example, the word search if they do not read).
- Choose the starting level of each one: 1 is very easy. It then goes up automatically after 5 rounds in a row played well and down after 3 with mistakes; this section also shows how many rounds they have played.
- Who is it? needs at least 2 favourites with a photo. It is the only exercise with sound (the phone's voice says the name), so check that it can be heard.
The person plays sets of 5 rounds: the dots at the top show which one they are on and, at the end, a prize appears with stickers and two buttons, to play again or go back to the games.
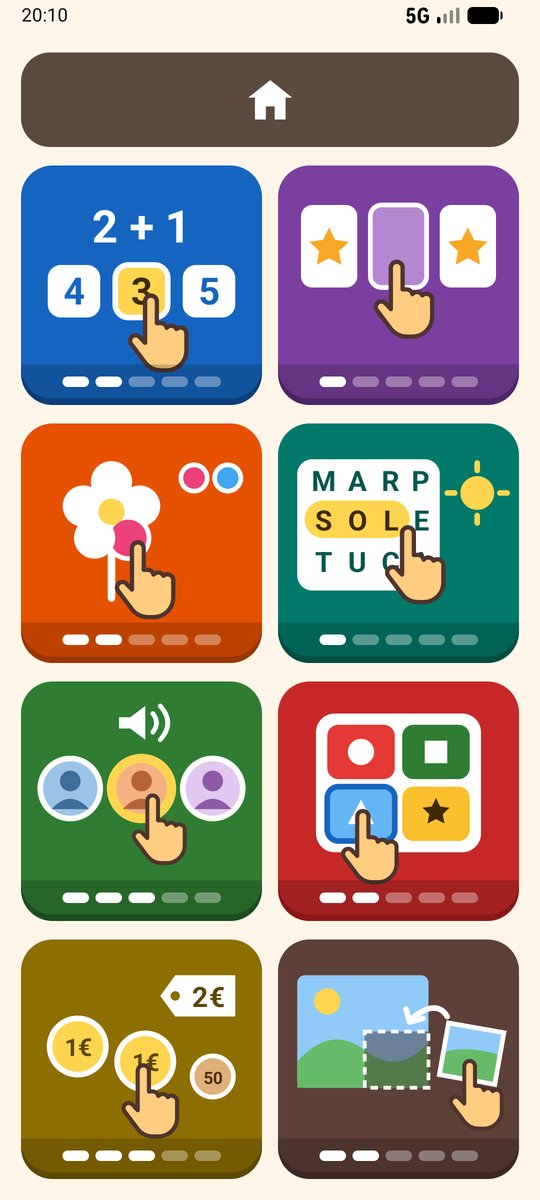
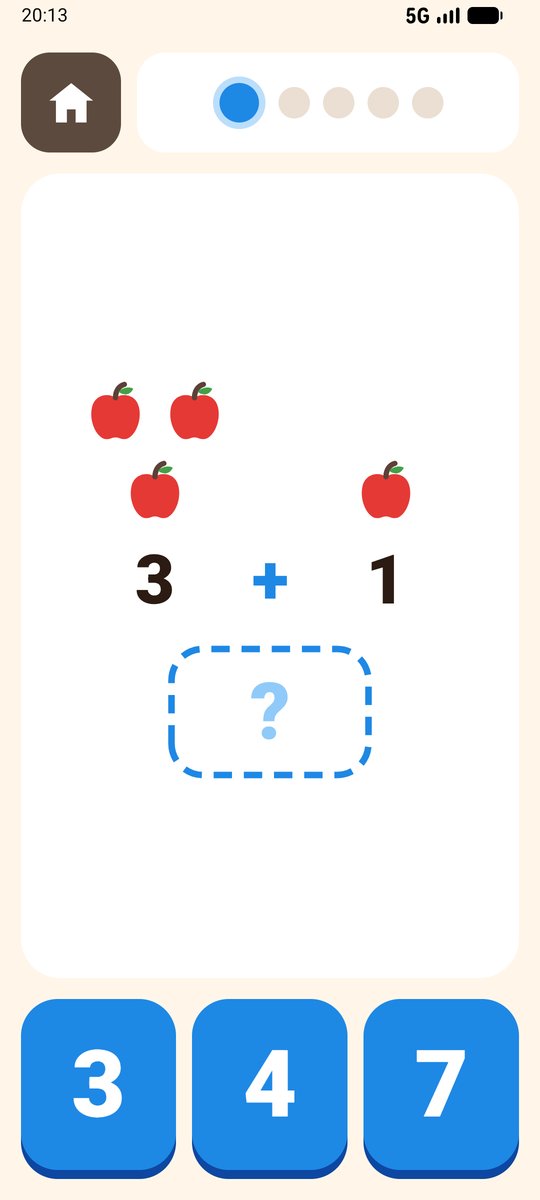
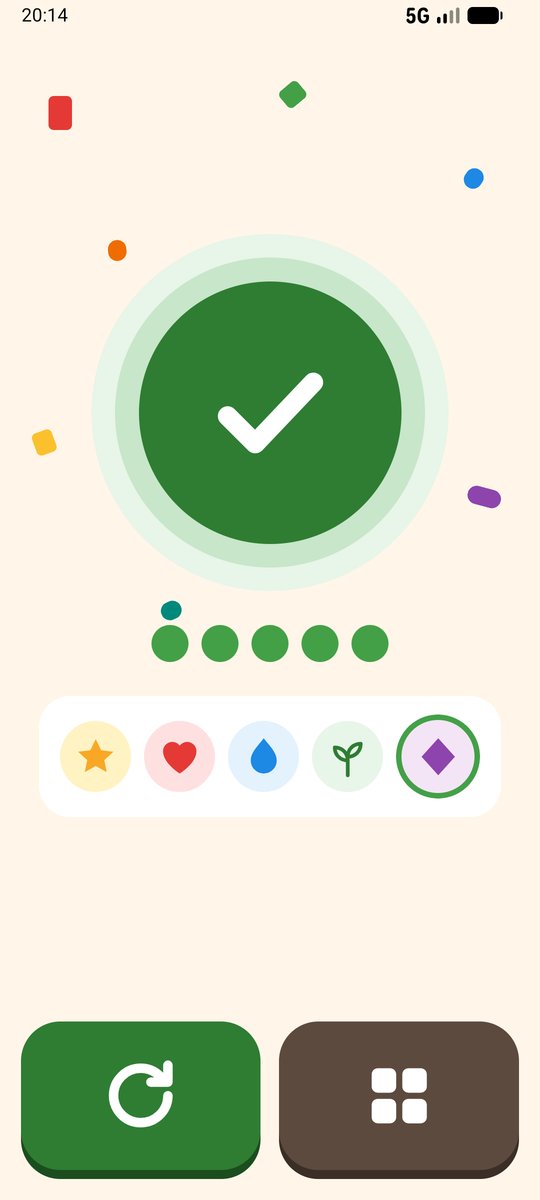
Tap the house at the top (or the arrow at the bottom) to go back to the home screen.
9.6. Radio (optional)
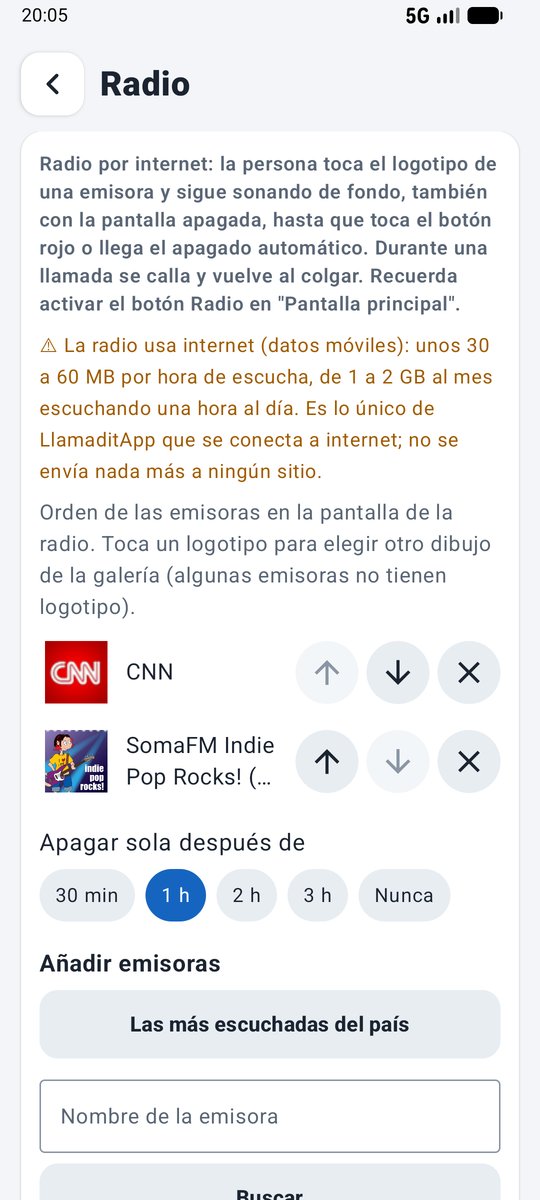
The person can listen to the radio by tapping a station's logo. It uses mobile data (about 30 to 60 MB per hour), so a plan with enough data is advisable.
- In the panel's Radio section, tap Most listened to in this country or search for a station by name, and tap the + of the ones you want (just a few is best: 4 to 6).
- Order them with the ↑ ↓ arrows and choose when it switches off automatically (by default, after an hour).
- In the Home screen section, turn on the Radio switch.
- Try it: tap a logo and check that it plays and that the volume buttons turn it up and down. The red button stops it.

9.7. Camera and photos (optional)
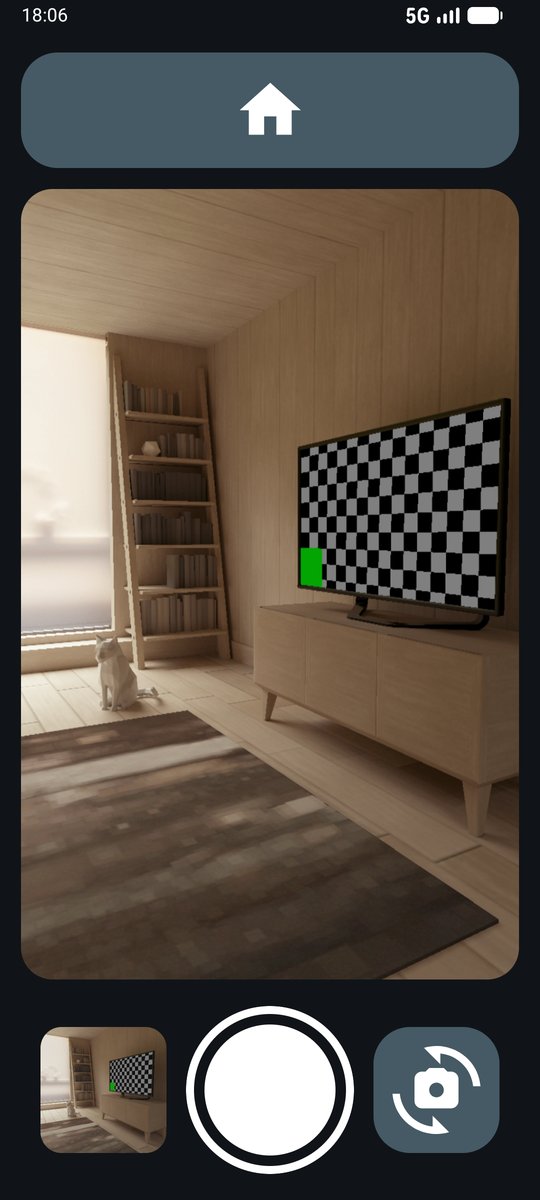
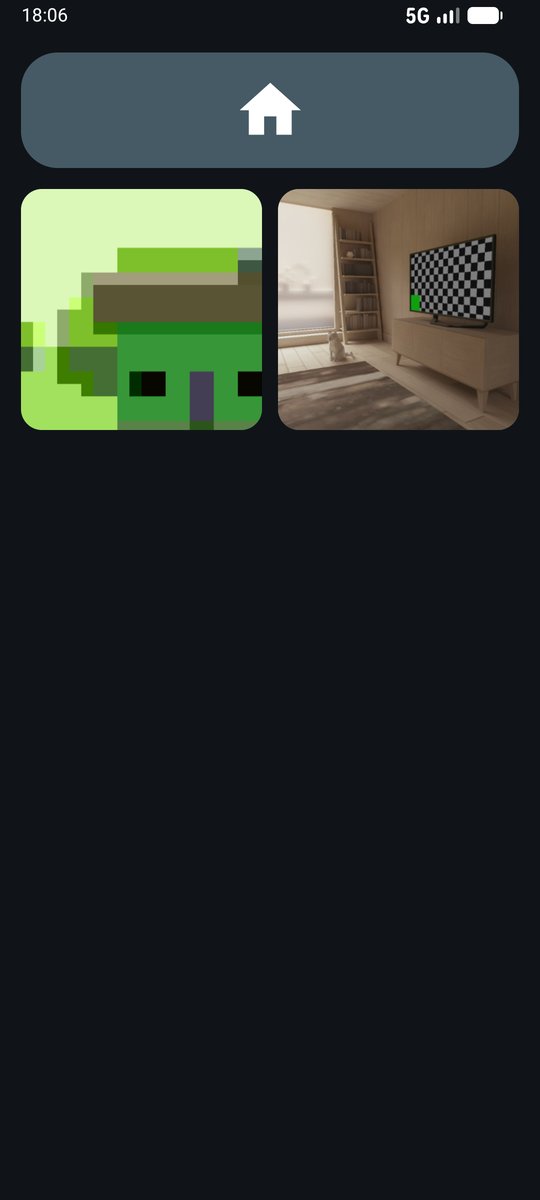
The person can take photos with the back or front camera, and look at them, using very simple buttons. It uses no data.
- In the Home screen section, turn on Camera, Photos or both.
- With remote management, you can also turn them on from the caregiver app or website, in Pantalla principal (Home screen).
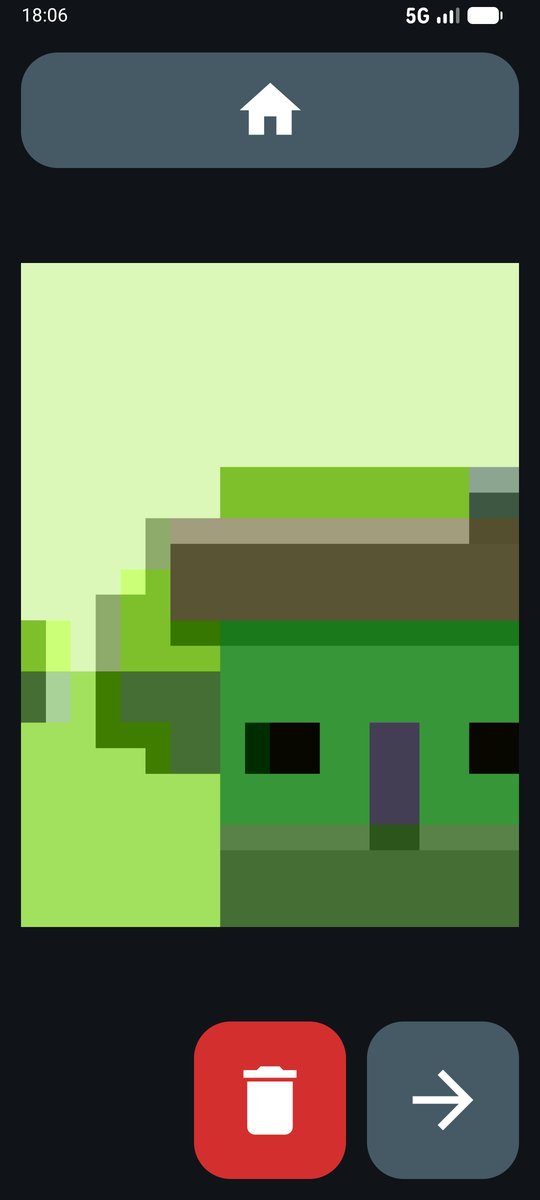
- Show the person the white circle, which takes the photo, and the bin in Photos, which asks for confirmation before deleting.
The photos stay on the phone and also appear in its Gallery, in the LlamaditApp album. They are not sent anywhere.
9.8. Low battery (optional)
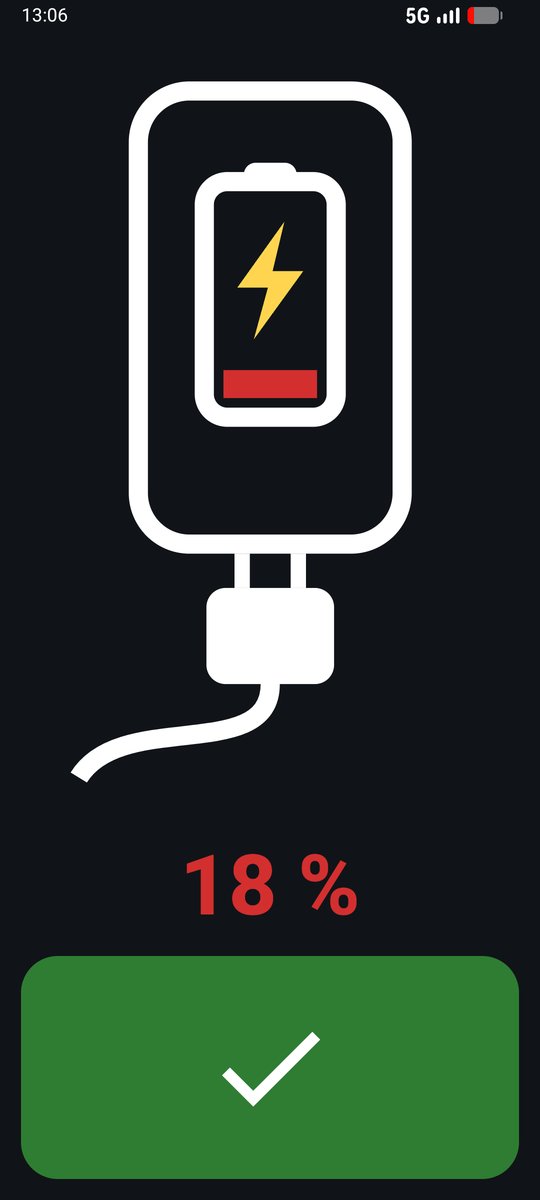
In the Low battery section, turn on Remind them to charge the phone and choose the level that triggers the warning (20% works well). Tap Try the warning to see what it looks like, and show the person that when they see it they need to plug in the charger (the warning goes away automatically) or tap the green button.
9.9. Pills (optional)
- In the Pills section, turn on Pill reminders and tap Add a pill.
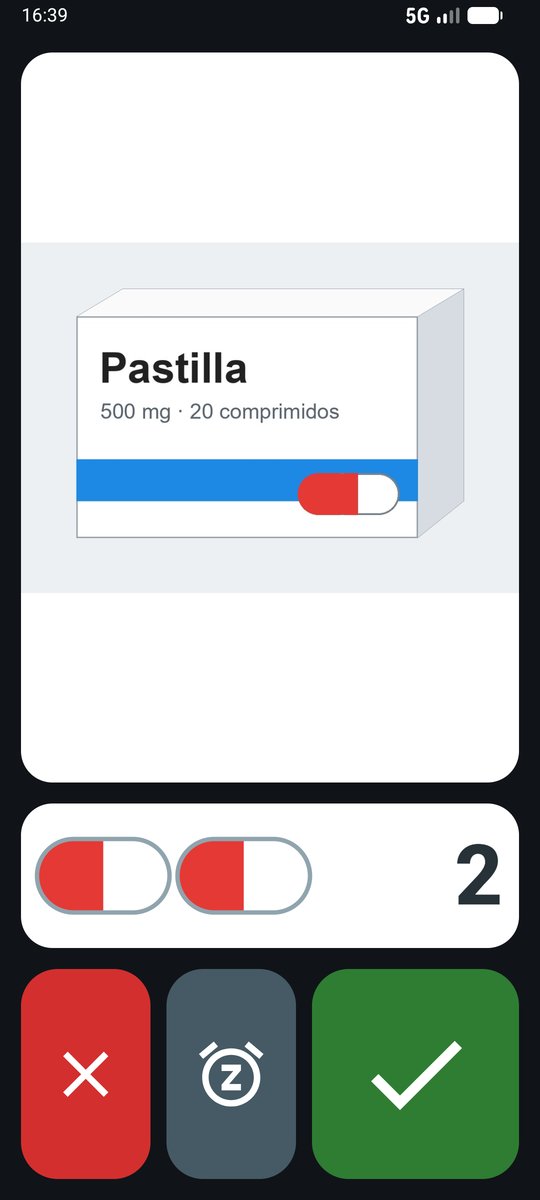
- Choose the time with − and +, how many (½ is half a pill) and take a photo of the box, from the front and with good light: it is what the person will see.
- Repeat for each pill. Pills due at the same time are shown one after another.
- Tap Try the warning with the person watching: they have to tap the green button each time they take one. The red one is for saying they are not taking it, and the grey alarm clock button snoozes it for 15 minutes.
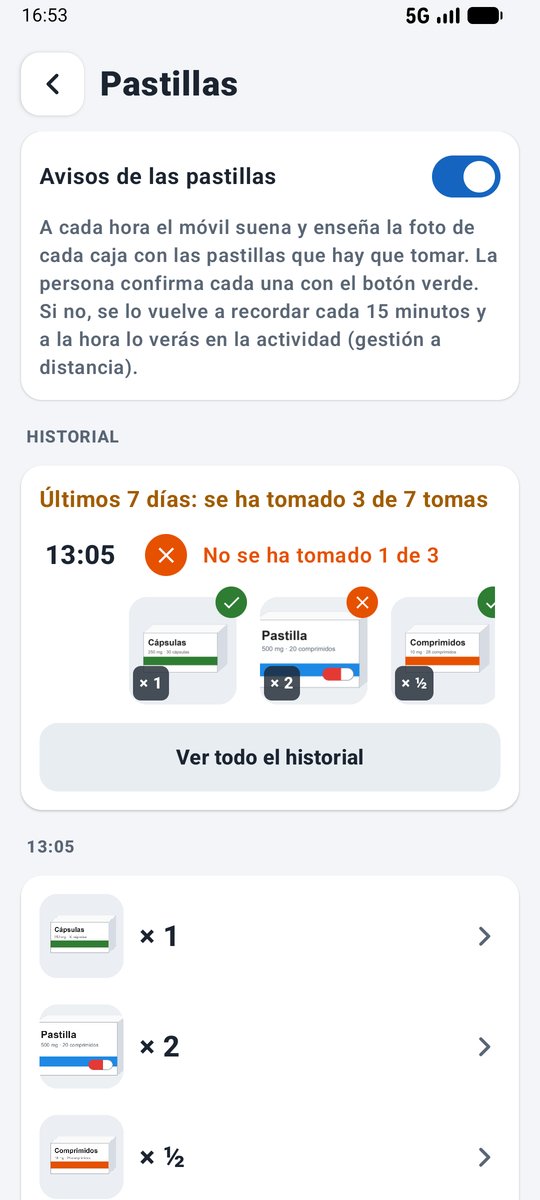
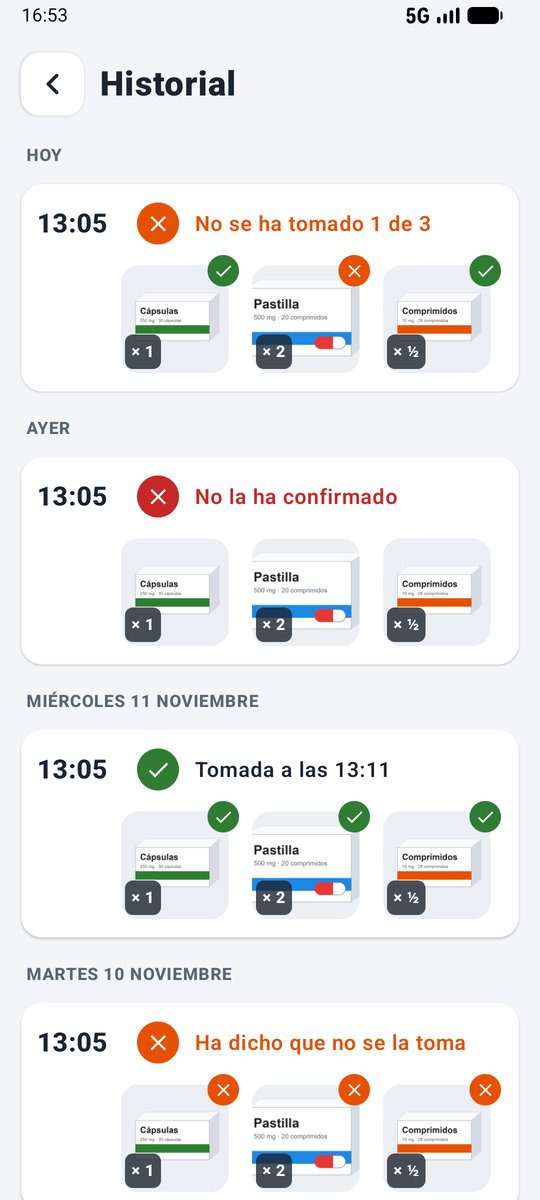
- From the next day, the same section shows the History: whether each dose was taken and when it was confirmed, whether they said they would not take it, or whether they did not answer, with a photo of each box so you know which pill it was.
With remote management you can also add and change pills and take the photo from the caregiver app or website, and the activity shows whether they have been confirmed.
9.10. Newspapers (optional)
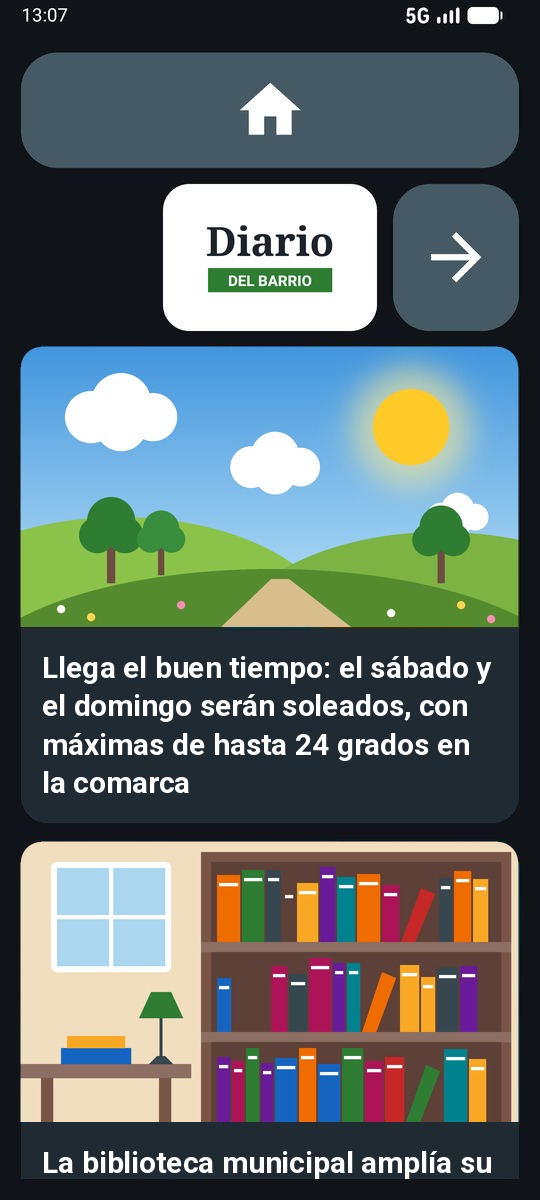
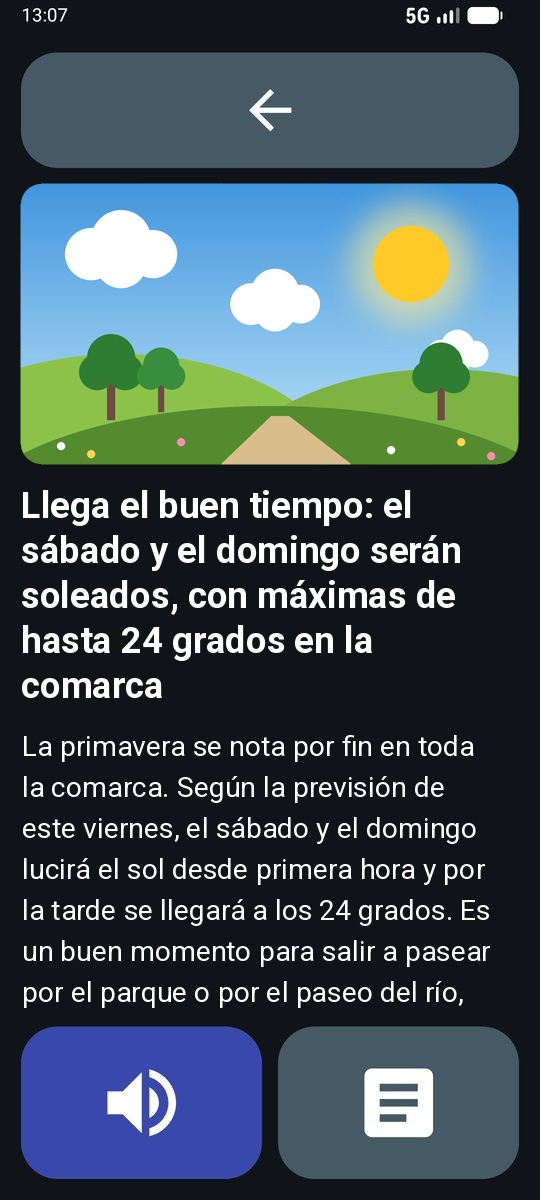
In the Newspapers section, turn on Show the Newspapers button and choose which newspapers they see. They are grouped by section (current affairs, sports, economy, technology, science, health, cars, cooking and film and TV); at first only current affairs is selected. If you choose from several sections, the person first sees one button with a picture for each section. The newspapers are Spanish.
It uses mobile data: a few MB each time a newspaper is opened. Cookie banners and ads covering the story are removed automatically.
10WhatsApp (optional)
Only if the person will make WhatsApp video calls.
- If you did not already add a Google account (step 8, option B), add it: the Play Store needs it.
- In the panel, WhatsApp section, tap Install WhatsApp. The Play Store opens directly on the WhatsApp page: tap Install, then Open, and register it with the SIM's number (a text message with a code will arrive).
- In the Play Store, tap your profile picture → Settings → Network preferences → Auto-update apps → Over any network.
- Keep WhatsApp awake (essential): otherwise video calls may not ring. From the panel, PIN and kiosk mode section → Open Android settings → Samsung: Battery → Background usage limits → Never auto sleeping apps → +, tick WhatsApp and tap Add (screenshots in section 11). Other phones: Apps → WhatsApp → Battery → Unrestricted.
- Go back to LlamaditApp with the back arrow (or the phone's home button): the panel is still open. In People, tap each person who uses WhatsApp and turn on Has WhatsApp (video call) (it can also be set in the WhatsApp section).
- Leave the panel with the house on the front page (or tap Finish on the blue card at the top). On leaving, LlamaditApp gives WhatsApp the camera, microphone and contacts permissions.
11Recommended battery setting
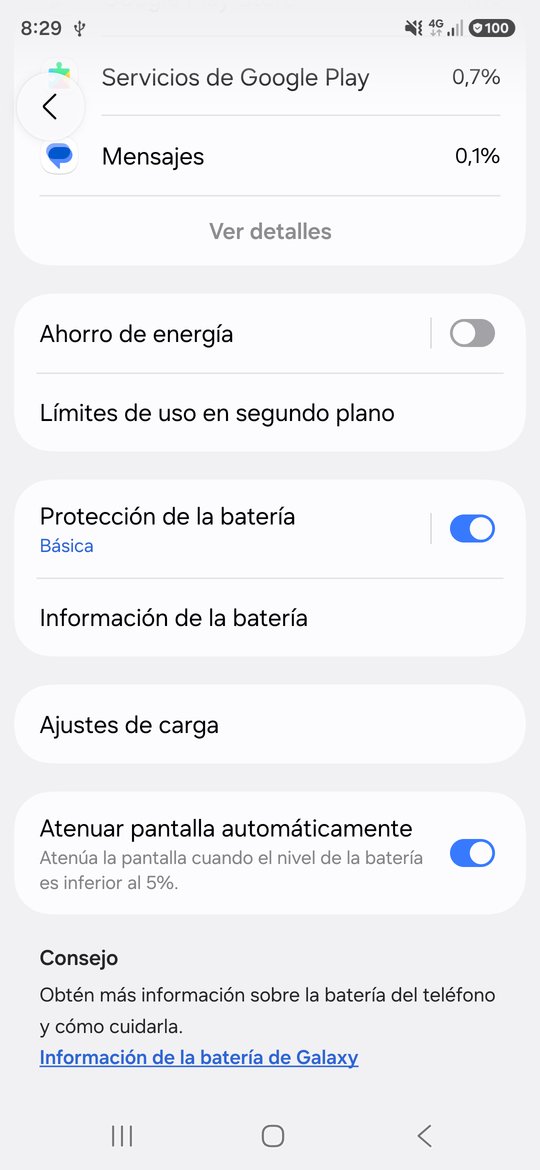
Samsung puts rarely used apps "to sleep" to save battery. If it puts WhatsApp to sleep, video calls may arrive late. LlamaditApp does not need to be added: Android already protects it.
Samsung: with kiosk mode paused, go to Settings → Battery → Background usage limits → Never auto sleeping apps, tap +, tick WhatsApp and tap Add.
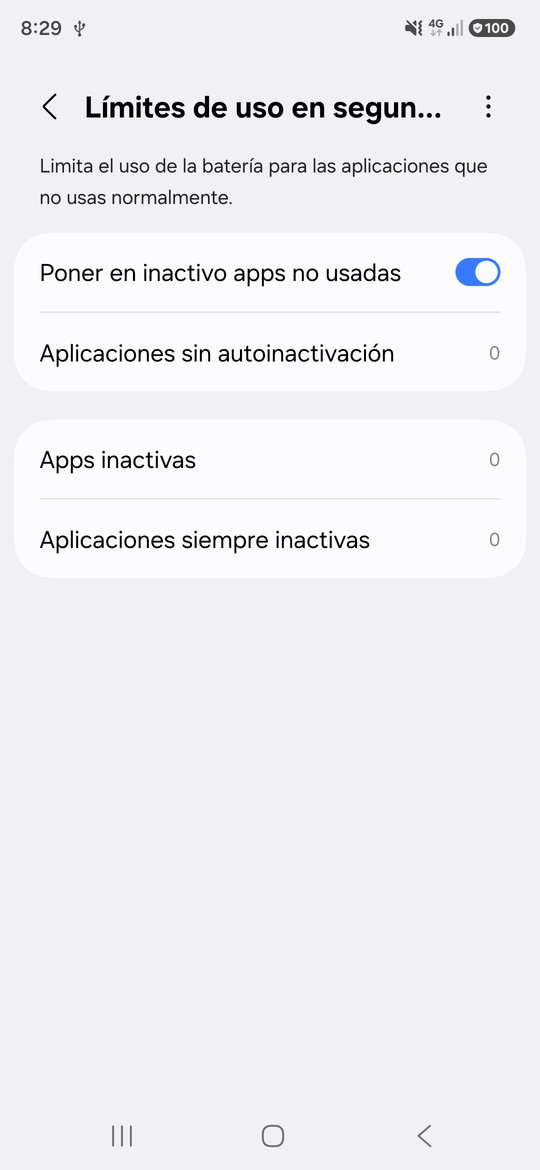
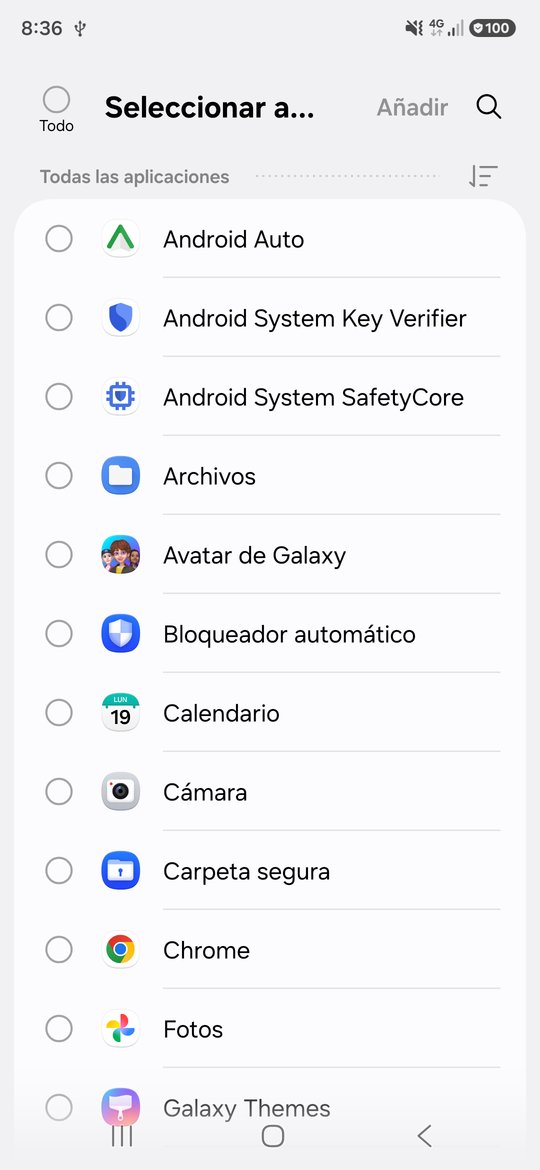
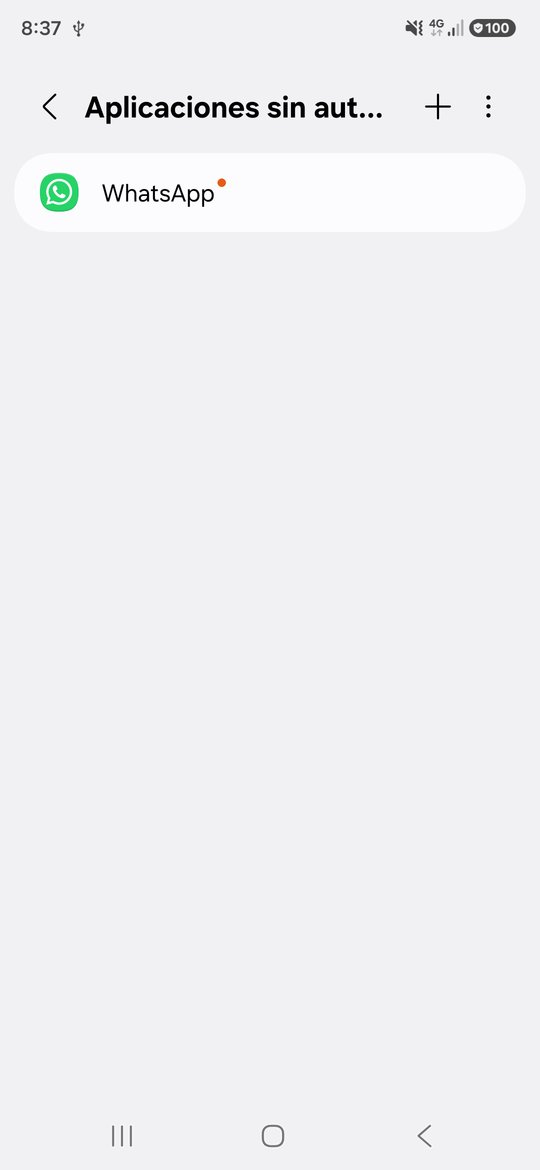
There are more settings worth checking ("Do not disturb" off, location on, etc.). They are all in the recommended settings (in Spanish).
When you finish, turn kiosk mode back on from the panel.
12Check that everything works and hand over the phone
Test each thing before handing it over:
- Call: tap a photo and check that it calls. Hang up with the red button.
- Receive a call: call the phone from another phone. A large photo should appear and the phone should vibrate; the green button answers and the red one hangs up.
- SOS (warn the trusted person first): hold the red button for 2 seconds. It should call them and send them a text with the location.
- Location: from a relative's phone, text the keyword (for example LOCATION). A reply with a Google Maps link should arrive.
- Volume: press the volume buttons; a big panel should appear.
- WhatsApp (if used): make a video call from the photo and receive another. Check that WhatsApp is in Never auto sleeping apps.
- Tailored screen: check that only the buttons they need are shown, at the right size, and that they recognise the SOS picture.
- Go home (if used): away from home, press the brown button. The address should appear and, if turned on, the SMS should arrive. Tap the arrow: on arrival, the front door photo should appear.
- Google contacts (if used): create a starred contact at contacts.google.com and check that it appears in Call.
- Phone plan: confirm with the operator that it includes SMS (SOS, location and "Go home" alerts) and some data.
- Full WhatsApp (if used): open WhatsApp with the light green button, send a voice note and go back with the house tab.
- Exercises (if used): open each exercise that is on and finish a round. In Who is it? the name should be heard.
- Radio (if used): tap a logo, check that it plays with the screen off and goes quiet if a call comes in.
- Remote management (if used): from the caregiver app or website, press ¿Dónde está? (Where is it?) and Hacer sonar (Make it ring), with the phone's screen off. All the tests are in the Remote management guide.
- Restart: turn the phone off and on. It should start directly in LlamaditApp.
- Lock: try to leave with the home and recent apps buttons. It should not let you.
Before handing it over:
- On the panel's front page, check that the top card says Kiosk mode on and, ideally, All set (nothing to review).
- Set up the relatives' phones so that SOS calls and texts ring even on silent: on iPhone, in the contact → Ringtone → Emergency Bypass; on Android, mark the contact as a favourite and allow it in Do not disturb.
🎉 All done! The phone is ready.
13If something goes wrong
| Problem | Solution |
|---|---|
| I cannot find "Build number" | In Settings, tap search and type build. |
| It will not let me turn on USB debugging | On Samsung, turn off Auto Blocker first (step 5.1). |
| The installer says it cannot find the phone | Try another cable (many only charge). Check that USB debugging is on. Unlock the phone and see if it asks you to Allow. |
| The installer says the phone has accounts | Remove them in Settings → Accounts and backup → Manage accounts, or erase the phone again (step 2). |
| "Windows protected your PC" | Click More info → Run anyway. |
| A contact does not appear in LlamaditApp | Check that it has the star ★ in Contacts. |
| A Google contact does not appear | Check that it has the star ★ at contacts.google.com and tap Sync now in the panel. If it warns that automatic sync is off, turn it on. |
| The "Go home" route does not load | It needs mobile data, unless you have downloaded the city map (section 9.2, point 6). |
| Google Maps asks to accept terms when opening the route | In the panel, tap Try the route and accept them yourself once. |
| The house tab does not appear in WhatsApp | In the panel, Full WhatsApp section, tap Allow the button to go back (section 9.4). Without that permission, the person has to leave WhatsApp with the back arrow. |
| In "Who is it?" the name is not heard | Turn the volume up and check the phone's text-to-speech voice: Settings → General management → Text-to-speech (on other phones, Settings → Accessibility), with the right language. |
| I forgot the caregiver PIN | You have to erase the phone (step 2) and start again. |
More solutions in the troubleshooting guide. Prefer commands to the installer? See the technical guide. Both are in Spanish.
Screenshots from a Samsung Galaxy A16 (One UI 8.5) and the Android emulator, in Spanish, with made-up contacts. Phone details hidden. Sample contact photo: Daniel Lara on Unsplash. In the version 1.3 screenshots, the sample address is Plaza de España in Seville and the front door is a drawing. In the 1.4 and 1.5 ones, the exercise drawings are original and the chat list is from a test app, not the real WhatsApp. Click any screenshot to see it full size.